plastic patio chair makeover
Michelle Hinckley never met a room she couldn’t DIY into something special. That’s why DIY ideas take center stage in her bright and colorful patio makeover. We’ve been fans of her DIY blog 4 Men 1 Lady for some time now, so we were excited when she agreed to take part in our Patio Style Challenge. We sent her a patio set from The Home Depot and let her creativity run free. As you’ll see, her new, improved patio is full of bright colors and bold patterns. Plus, she shares her clever DIY touches that make her patio one-of-a-kind. We are so lucky to have a really spacious outdoor patio right off our great room. But during the winter it becomes a huge, ugly eye sore where miscellaneous stuff gets thrown and stored. It feels like more of a junk yard then a beautiful outdoor oasis I’d rather it be. When The Home Depot asked if I’d like to participate in their Patio Style Challenge, not only did I want to join in… our patio was screaming for a makeover! You can see we had our work cut out for us to transform this space.

I envisioned lots of color and pop to wake this patio up. We were sent the Brown Jordan Greystone Dining Bar set as the jumping off point for our makeover.
cape cod chairs big w Once we cleared the patio and set up beautiful table and chairs I knew I wanted to make the space feel cozy and private.
chair covers and sashes for cheapThe best way to do that was with the addition of some outdoor curtains.
cheapest camping chairs ukI found some generic white ones at a big box store, but unfortunately they were too short.
cheap pushchair sitesSo I enlisted my talented mom to help lengthen them with some left over fabric scraps I had.
pool lounge chairs with canopy
Now how to hang them? I’m no stranger to plumbing pipe projects (table, bookshelf, bunk bed ladder), so I decided to test my DIY skills to see how it could make them work as curtain rods.
best ergonomic office chair cheap It really was a simple project. The Home Depot sells various sizes, lengths and parts, plus they will cut and thread the pipe for you at no charge. For this project I just put curtains up in the corners of my space to give the illusion of privacy and coziness. All you need for one rod return are: Now that I had the rods and curtains hung it was time to bring the indoors out by introducing something that you might normally use indoors only. Mirrors have long been used in decorating because they make a space look bigger plus they bounce light around a space. I decided to bring one of my mirrors outside and give it a little makeover. DIY Rope Mirror Hanger
I bought the hemp rope (sold by the foot) at The Home Depot. The first thing was to attach the mirror to the wall. 1. Find the half-way point of your rope, and hang it from a hook centered above the mirror. 2. Next, use a bead of hot glue to attach one of the ends to the bottom of the frame of the mirror. 3. Do the same process for the other loose end so that both ends of the rope butt up to one another, giving the illusion that the rope is one long piece with no breaks. The result is a custom DIY piece. I like this rope hanging mirror technique because it is much more secure when the wind blows, plus, if you decide you don’t want the rope around the mirror in the future you can just remove the hot glue with a knife or razor blade. Next up, I needed a place to set food and drinks for entertaining. A few months ago I picked up this old school cart at a school auction for around $5. It was dirty and rusted, but still functional. I could see that it had the potential for something really chic with a little TLC.

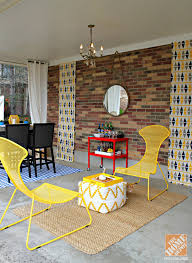
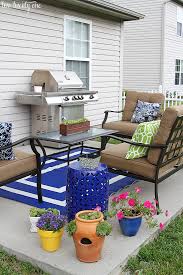
Just took a little elbow grease to clean it up, a coat of spray primer and Poppy Red spray paint from the Rust-Oleum line, and now I have a chic bar cart perfect for drinks or hors d’oeuvres. After seeing how bright and bold my new bar cart turned out I went a little wild with more spray paint… It’s amazing how a little paint can completely transform a project. One last DIY project makes our backyard patio complete. You might be very surprised what we made them from. While at The Home Depot I spotted these very colorful tomato cages, and knew I had to figure out a way to utilize them in our makeover. The Mister cut the three top wire pieces off which allowed for a terra cotta pot to fit perfectly to create a colorful and unique pot holder. It creates instant height and levels for visual interest. The trick is going to be keeping the plants alive. I swear you can hear plants scream when I’m in their presence. Now that we’ve got all the DIY projects out of the way let’s see how the space came together…

We were able to fit a dining area with our lovely new Brown Jordan bar height dining table and a lounging area. The table and chairs really are luxurious! To break up the large brick wall I found some fun fabric and just stapled it to the wood trim above and allowed it to drape down. I made the cement planter you see above. Check out my cement planter tutorial on Remodelaholic. The patio is bland no more. Bright color and texture bring the patio alive and usher in spring! Michelle Hinckley writes about bringing beauty to a house full of boys — her husband and three boys — in the blog 4 Men 1 Lady. Take a look at her blog and you’ll see her passion about decor and DIY. Michelle chose the Brown Jordan Greystone Patio Dining Bar Table and the Greystone Patio High Dining Chairs for her small patio makeover. For more simple decorating ideas for your patio or backyard, see other Patio Style Challenges here on the Home Depot Blog. Follow our Patio Style Challenge pinboard on Pinterest, too.