outdoor swing chair timber

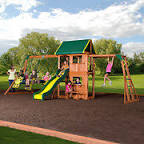
You can hire a contractor to build an outdoor play set on your property, or you can try to figure out the project from scratch—but we don't recommend either approach. The first is expensive. The second is risky: Do you know what constitutes hardware that's strong enough to support a swinging child? That's where this DIY wood swingset comes in. It combines hardware that comes as a kit from a reputable company with lumber you source and cut yourself, as well as swingset plans you can follow. ; about $600), which had everything we needed for two swings, a trapeze bar, a sandbox, a 10-foot wave slide, and a ladder up to a canopy fort. The kit also includes detailed construction plans, bolts, screws, and brackets. We spent about $350 on lumber and got to work. Two people can put up this play set in a day and a half to three days, depending on their skill level. But we suggest you take your time and get the kids involved. For them, the only thing better than playing on it may be knowing they helped build it.

Build the Fort Backyard Swing Set Plans (PDF, .5MB, requires Adobe Reader) I cut most of the swing set parts in the garage. Where possible, I bored holes for lag screws and bolts and test-fitted subassemblies, then carried these outside. To build the elevated fort, take four 4 x 4 posts, two 2 x 4 tarp boards, and two 2 x 6 sandbox boards and fasten them together into subassemblies, each consisting of a pair of posts, a sandbox board, and a tarp board. Stand these subassemblies up and brace them in position, then span a horizontal 4 x 4 deck support between each pair of posts. With the holes prebored in each deck support, level it and clamp it into position. Use the bolt holes in the support to mark the position of the holes in the posts. Remove the support, drill the holes through the posts, then bolt the deck supports in place. 7 - 4 x 4 x 8 ft Pressure-treated lumber 2 - 4 x 4 x 10 ft Pressure-treated lumber 2 - 4 x 4 x 12 ft Pressure-treated lumber

Bore bolt holes through the deck supports and through the posts. Loosely bolt each canopy post in position. Span between the canopy posts with a 2 x 4 brace across their tops and lag-screw it to the post ends. Stand the canopy posts upright and use a 4-foot level to ensure they're plumb, then tighten the nuts on the bolts. Step 2: Fasten the Boards Next, fasten the deck boards to the deck supports and install the deck stringer. Note that eight of the 11 deck boards are cut from 2 x 6s. Three others, called out separately in the materials list as deck spacers, are cut from 2 x 4s and are positioned between the fort posts and the canopy posts. This creates a neat and evenly spaced deck floor. Install the panel boards and wall panels. Step 3: Build the Ladder Build the ladder and install it. Notch the top of one of the ladder legs to get the ladder to fit properly (see the detail view in our illustration). Step 4: Install the Swing Beam Fasten the six swing hangers to the swing beam.
Then join together the two 4 x 4 swing-beam legs using the leg bracket. Step 5: Fasten the Beam Mount the swing-beam support on the fort, then screw the swing-beam bracket to the support. With a helper, stand the swing-beam legs upright and position the beam. Fasten the swing beam to the leg bracket and to the support bracket. Step 6: Finishing Touches Finally, install the swing-beam cross support on the legs, the safety board adjacent to the sandbox, the front panel board above the slide, and the remaining boards for the sandbox. Run a lumber border around the play area and spread wood chips throughout, then fill the sandbox with sand. Install the remaining hardware and attach the wave slide to the fort. Final step: Play with your kids. 6 Garage Door Repair Fixes & Tips Things You Should Never Do on a Ladder What's Wrong With My Brass Carriage Lights? Should You Be Using Architectural Shingles on Your Roof? Do Repair Kits for Wood Gates Actually Work?

How To Make a DIY Jack out of 2 x 4s Why Your Deck Stain Is Peeling Off What to Know Before You Build a Retaining Wall Wild Winter Storm Stella Calls for Clever Snow Removal This step by step woodworking project is about free porch swing plans. A wooden swing offers comfort when you want to relax after a day of hard work. Taking into account is an easy project, you should consider making one for the loved ones. Your friends and family will enjoy this space, as it has a beautiful appearance and adds value to your property. This spring project can be done in just an weekend, using common tools and materials. Don’t forget to take a look over my list of woodworking projects , as you might get more awesome ideas for your home. This project should only be the beginning of your DIY experience. After you design the wooden swing, you have to buy the materials required for the project, from your local diy store. Cedar, redwood or pine are good choices as they are resistant to rot and have an exquisite look.

Work with good judgement and with attention, making sure you measure the components several times, before performing the cuts. Secure all the joints with wood screws or bolts, making sure you also increase their rigidity will wood glue. Sand the wooden surfaces with sandpaper of different granulation. A – 2 pieces of 2×4 lumber 20” long, one end cut at 15º SEAT SUPPORT B – 2 pieces of 2×4 lumber 23” long, one end cut at 15º BACK SUPPORT C – 3 pieces of 2×4 lumber 55 1/2” long BRACES D – 4 pieces of 1×2 lumber 11”, 4 pieces of 1×2 lumber 10 1/4”, 2 pieces of 1×3 lumber 19” ARM RESTS E – 10 pieces of 2 1/2” galvanized wood screws EYE SCREWS F – 24 pieces of 1×2 lumber 60” long SLATS 3 pieces of 2×3 lumber – 8′ 1 piece of 1×3 lumber – 8′ 23 pieces of 1×2 lumber – 8′ 100 pieces of 2 1/2″ screws 50 pieces of 1 5/8″ screws Hammer, Tape measure, Framing square

Miter saw, Drill machinery, Screwdriver, Sander Safety Gloves, Safety Glasses Building a wooden swing for your porch is a straight forward project if you use the right plans for your needs, as well as proper tools and carpentry techniques. In order to get the job done properly, you should follow teh step by step instructions and take accurate measurements. Top Tip: Align all the component at both ends, before locking them with screws. Use a spirit level to level the seat and to plumb the sides of the porch swing. Make sure the corners of the seat frame are right-angled. First of all you need to build the seat supports, out of 2×3 or 2×4 lumber. As you can see in the image you could make a curved seat and cut it out with a jigsaw, using the pattern in the image. On the other hand, if you want to get the job done quickly, you could just cut one end of the support at 15º and round the opposite end. Smart Tip: Round the exposed edges with a router or a sand-block.

Afterwards, you build the back support from 2×3 or 2×4 lumber, making sure you round one end and cut the opposite at 15º. Afterwards, notch the components, in order to lock together easily. Use a circular saw to make multiple cuts and clean teh recess with a chisel. Add glue to enhance the bond of the joints, drill pilot holes and insert the carriage bolts. Countersink the head of the bolts, in order to obtain a neat look. Assemble the frame of the wooden swing. Therefore, cut three braces out of 2×3 or 2×4 lumber at the right size. Place the braces between the side components and align them thoroughly. Make sure teh corners are right-angled, using a carpentry square. Drill pilot holes trough the side components and insert the 3” wood screws in the braces. Work on a level surface, in order to get consistent results. After assembling the frame of the porch swing, you should build the armrests and install them into place. As you should notice in the image, you have to build several components and secure them to the seat and back supports.

Build the frame of the armrests from 1×2 lumber and secure them to the supports. Drill pilot holes and insert the 3” wood screws. Add glue to enhance the bond of the joints. Build the slats from 1×2 lumber and install them into place. Drill pilot holes and countersink them, before inserting the decking screws (2 1/2” screws). Align the slats making sure they overhang about 3/4” on both sides of the frame. Notch the slats to fit around the armrest supports. Work with great care, making sure you place a nail between the slats. In this manner, you would get consistent gaps between the slats. Continue the project by installing the slats to the backrest, in the same manner described above. Cut the 1×2 slats to the right size and fit them into place. Notch the slats to fit around the armrest, as you should notice in the plans. Top Tip: Round the exposed edges of the slats using a router and a 1/4” bit, if you want to enhance the look of your wooden swing. Don’t forget to countersink the head of the screws.

One of the last steps of the project is install the eye screws to the frame of the armrest and to the backrest support. Repeat the procedure on the opposite side of the swing. Use thick rope or chain to hang the swing to the porch ceiling. Leave about 16″ off the ground to the seat. The swing should be secured properly to support the weight of the swing as well as the people that would occupy it. The last step of this project is to take care of the finishing touches. Therefore, fill the holes with wood filler and let the compound dry out for several hours. Sand the wooden components with medium-grit sandpaper and remove the residues with a vacuum. I recommend these hangers for securing the swing to your porch ceiling. Top Tip: In order to protect the wood from rot, apply several coats of stain, according to manufacturer’s instructions. Make sure the swing is level and secured properly, before using it. Make sure you take a look over the matching swing stand project , if you want more flexibility, so you can move it anywhere in your garden.