ikea desk chair wheels

This entry was posted on April 3, 2014. If you want to replace a cylinder on your office chair, or return or ship it, you may need to know how to disassemble your chair. If you have the proper tools, disassemble is not difficult. These instructions explain how to remove a cylinder. When it comes to removing the chair arms and back, that is easier and since each chair is different, we won’t try to explain that process here. Extend the chair as high as it will extend, and remove the back and the arms. Then flip your chair upside down. Use a hammer or mallet around the cylinder rim that protrudes from the center of the base. Be careful not to use the mallet on the cylinder middle or tab. Hammer all sides numerous times. This is easier if someone holds up the chair for you. 5-10 hammer hits should cause the chair to fall from the base. This leaves the cylinder attached to the under-chair control. Apply your lubricant where the control mechanism meets the cylinder and let it sit for 10 or 15 minutes.

Use the pipe wrench or vise grips to grasp the cylinder as close as you can get to the control mechanism. Use an assistant or your body weight to prevent the seat from moving. Push forward on your vise grips or pipe wrench. After 5-15 seconds pushing, it will twist. When you feel it twist, the cylinder should come off easily. Total time is usually 10 or 20 minutes, as long as you have the right tools. After you remove the original cylinder, replace that with a new one and assemble the rest of your chair as you did the first time. Package your chair as it was when you received it. You may not need the original box, but usually you will. Include all protective packaging or pack with bubble wrap. You will be liable for any damage in shipping.When I completed my Janery Studio Makeover, I did a lot of simple projects to make the space look and feel a little more finished. One was the simple slipcover I created for my Ikea Jules desk chair that I use when I’m sewing. The swiveling wheels and the $39 price tag made this a great find for the sewing studio, but the aesthetics of the chair left a bit to be desired.
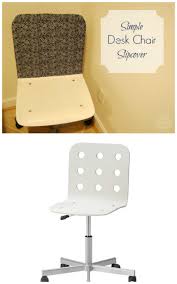
All the chair needed was a more decorative cover for the back, and with its simple lines I knew I could easily make a cover to slip right over it. First, I hemmed a piece of fabric that was a little more than 2 x the width of the chair back.
the hawaii chair commercial I traced the outline of the back of the chair onto wax paper to create a template.
flexible love chair australia I folded the hemmed piece of fabric in half, wrong sides out, and then ironed that waxed paper onto the two layers of fabric.
dining room chairs melbourne I then used my machine to sew through the paper and the two layers of fabric – sewing about 1″ wider than the line I had traced on the waxed paper.
chairs for sale regina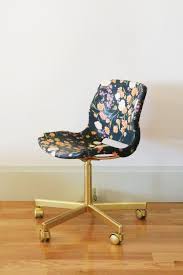
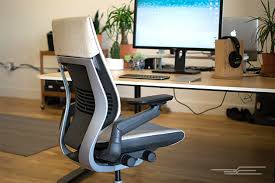
Here's how it works: Anybody can ask a question The best answers are voted up and rise to the top My roller chair is now immovable since there is somehow HAIR, which is about 3 feet (9 dm) per strand, rolled and tangled into all 5 wheels. Below is a picture of the chair: MSRP for this chair: $625.49 I cannot afford to take it to get fixed, and I don't have tools to take the legs off and clean them. Is there a solution for my problem? Turn the chair upside down on a desk or on the floor. Use small scrub or tooth brush or mascara brush/wand, and clean the caster with soap water or alcohol. This will remove dusts and keep only hairs and threads that got tangled. Remove the visible hairs using butter knife on the crevice of the caster on both sides. Kitchen Tweezers are very helpful here. Use nail clipper/cutter's bottle opener. It will have pointed curve. Insert it into the fissure, Catch the hairs and pluck off the hairs. Keep revolving & rotating the caster strategically by other hand while doing this and this will help the tool to catch more hairs.
Simply cut a section of duct tape and then stick around the cover and pluck off. You can also cut a section of duct tape and fold it back around your razor knife so that it will be like a closed loop ready to stick, then insert it under the wheel cover and pluck off. Reason why Razor knife is because they are very thin. Do not use sharp knives including razor knife. It will cut the hairs and make it difficult. But if the hairs are very stubborn and likely to tangled like a closed loop, cut the hairs with small manicure scissors or razor blade to break the closed loop. If you are not satisfied after trying the mentioned workarounds, then I would recommend you to get a screw driver and remove the caster from the chair, then wash on the soap water and apply lubricants. The example sample images are taken from Google search I think my answer will come as a surprise to most people, since I did not see it online during my repair attempts. The wheels or rollers used by common office chairs are universal.

They're called "casters" and you can buy a set of five on eBay for around $8, including shipping. Because the other methods can take hours, replacing them is cost effective for anyone making even minimum wage. Unfortunately, while you can remove them, there does not seem to be a simple way to disassemble the casters themselves for repair, since the most popular YouTube method for doing so involved complicated drill holes and other carpentry. I found both the knife and the conventional lighter methods to be ineffective. I did not try the Iroda torch pictured in another comment ($60). I declined to try either of the high-concentration hydrogen peroxide or drain cleaner methods proposed online. I had the idea to try a Dremel tool with a flat attachment ($80), but again that is price prohibitive if you do not already own one, and may not even work. If you don't mind the smell, use one of those: Although being plastic, the material of the rolls is quite thick, and thus doesn't heat up so quickly (Just like the "trick" where you can hold your hand into a candle for a fraction of a second).

Just briefly (a second or two) hold the flame inside the wheel and watch the hairs go up in smoke. They burn nicely but smell awfully. Unless you have really lots of dense greasy hair in there, the burning will not harm the rolls. For added safety, have it burn only for a second or two on its own and then blow it of. Scrape of the brittle remainders with whatever you have available ( I used a screwdriver ). Of course do it with all the necessary precautions. Outside, nothing flammable around, a bucket of water in case something goes wrong etc. I used wooden matches to burn the hair and a pair of tweezers to remove the residue. Then I sprayed DW40. Thank you for your interest in this question. Because it has attracted low-quality or spam answers that had to be removed, posting an answer now requires 10 reputation on this site (the association bonus does not count). Would you like to answer one of these unanswered questions instead? Not the answer you're looking for?