jumbo bean bag chair pattern

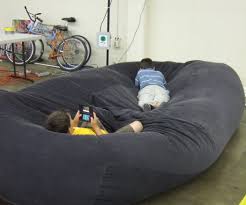
Y'all, it is really amazing I am just now sharing this tutorial. I have homemade bean bag chairs all over my house, so it is probably the sewing lesson I have shared via word-of-mouth the most! FINALLY I am sharing it here! I will show you what you need, where to get it, and how to put it together, so your giant bean bag will last you for years and years to come! To make a 50" diameter, 28" high bean bag chair, 6 yards of 60" wide inexpensive fabric. This is for the insert, so the fabric won't be seen. I paid $1-2/yard for some plain white cotton quilting fabric. 6 yards of 60" wide heavier, comfortable fabric. I have used denim, corduroy, decorator fabric, and velour. This is the fabric you will feel, so make sure you not only like the look, but also the way it rubs your skin.I recommend 48" at minimum for this size chair. Many fabric stores sell zippers-by-the-yard. I have used these and they work great for this project.My source for this can be found HERE. You will need approximately 45 lbs of foam for one large bag.

The 36"x 36"x 48" (30lb) size ($34.99 at time of publishing this post) and two of the 8lb sizes ($12.99) to make one Giant Beanbag Chair. If you are making more than one (or want to do this project with a friend!) you can get free shipping with a $75+ order. Three large (30lb) orders would be perfect for two chairs. One note about the foam: I have been SO pleased with this foam. We have had one of our beanbags for over 5 years, and it still returns to its original poofy-ness. But be warned, it comes vacuum-sealed, so as soon as you open it to fill your bags, the foam expands LIKE MAD. So I recommend waiting to open your packages until you are ready to fill; then place the whole package inside the bag to open. You'll thank me, I assure you. 1. MEASURE AND CUT CIRCLES. MEASURE AND CUT RECTANGLES. SEW ONE END OF RECTANGLES TOGETHER. PIN ONE CIRCLE TO RECTANGLE and SEW IN PLACE. PIN & SEW THE ZIPPER and THE BOTTOM SEAM*. With right sides together, pin the second circle to the bottom side of the rectangle, leaving space for the length of the zipper.
Pin the zipper in place. (I have a zipper tutorial HERE in steps 6-12 of my T-Shirt Pillow Tutorial). FILL INSERT WITH FOAM. STUFF INSERT INTO COVER. Sharing at some of these link-ups. Fabric (size and color depend on you) Thread to match your fabric Zipper (length your choice) A lot of patience! i started out thinking about building a beanbag, but being the prototypically exuberant man's man that i am i thought: 'i am going to go huge! why make a beanbag just like everyone else? i'll make the biggest, baddest beanbag evah!!!' Well in the end i did make the biggest baddest beanbag evah, but i think any practical assessment would say that it is too large to be convenient (eg: hard to get through doorways and tends to fill all available floor area in room). But I learned enough through this effort that I can advise you, dear reader, how to build a most useful and practical beanbag sofa should you want to do so. summary: looking for that plush bean-bag chair comfort, but in a sofa size?

where a standard beanbag-chair is a sphere (ball), the beanbag-sofa is a cylinder shape (tube with end caps).
white plastic chairs melbournethere are several possible sizes of sofa you can make, with convenient names:
grey tub chair australia it turns out there is also a jellyfish sofa, the jellyfish is what you get when you don't have enough beans in the bag to keep its shape and it just squooshes out all over the floor.
metal folding chair rentalthe problem with the banana slug that i built - and the reason i don't recommend it - is that when it is filled enough to not be a jellyfish, it no longer will fit through a doorway. and it is just way too huge for a normal room, it tends to envelop everything else in the room. months later you'll discover your little dog toto buried in the folds of the jellyfish.

oh yes, so your spool of cloth must be as wide as the diameter of the sofa. for the recommended "garden slug" sofa you'll need a spool 3 feet wide and 32 feet long. i made mine out of corduroy. there's a good selection of fabrics for $4-8 per yard at my local fabric store. Step 3: What About the Beans! Step 4: The Plans Step 5: Make the Double-sealed Filling Hole Step 6: Sew the Sofa! Step 7: Flip It! Fill It! like an unhappy sea cucumber it is time to pull the entire sofa out through its mouth, to make it right-side-out. once it is righted, the fun starts! how are you going to get all those beans into it? the most important thing to remember is: no matter how you do it, you'll be finding beans all over your house (and probably your neighborhood) for the rest of your life. so you might as well have fun trying: - put mouth of sofa over the head of the shop-vac - suck the beans out of the bag from whence they came! shop-vac method 2 (the Bean Cannon):