chair rail molding with shelf

Basement Designs Basement Ideas Basement Remodeling In The Basement Playroom Ideas Remodeling Ideas Basement Doors Bookcase Door Bookcases Forward Basement Remodel contemporary basement - secret room - PERFECT for a guest bedroom, office or "get away room" for when the house is too hectic and you need some peace!:WG R136 1-1/8 in. x 2-1/2 in. x 96 in. Primed Finger-Jointed Chair Rail This page contains some ideas for building chair rails by stacking 2 or more separate trim molding profiles to simulate historic designs and create new ones. Included here are some narrow and wide profiles, as well as ideas for a display shelf and wainscoting cap. This is a simple, easy to build design made by stacking a small, milled chair rail profile on top of a broader backer board. This is a specially made backer but you could also use two, one-piece baseboards or door casings and butt them at the middle to expose the decorative edges. To install this design, the back board is nailed to the framing first using 2 or 2½in finishing nails to fasten it to the wall studs along the center so the holes will be covered by the top molding piece.
The top piece is then nailed to the backer board using shorter, 1 to 1½in nails. Apply caulking where the trim pieces meet and fill exposed nail holes with painter's putty.
old church chairs uk This chair rail is built using a backer board, a stop bead profile and half-round bead molding.
white plastic chairs hireThe half-round can be single pieces or simulated with a one-piece reed.
egg chair for sale usaThis design, like most combination moldings, can be changed by using different trim profiles for one or all members.
bid or buy chair coversInstall with nails along the center of the backer board and then assemble the stop bead and half-round using wood glue and nails.
where to buy glider chair cushions
The curls and coves in the back band in this profile creates a Victorian style chair rail. This can be made wider using a 1x6 or 1x8 instead of the 1x4 used here.
tents and chairs south africaAdd more half-rounds or use a different, more ornate molding along the middle of wider designs for a more dramatic trim.
bean bag chair in french To install this the 1x4 is nail to the framing with 2 or 2½in nails.
vintage chair hire ukShorter nails are then used to attach the back band and the half-round to the 1by.
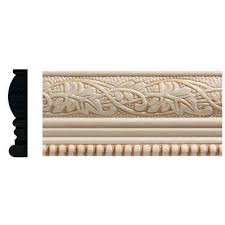
chair rail molding with shelf This design is built using a one-piece reed profile, and 2 pieces of panel molding along the top and bottom edges.

This is another wide, elaborate chair rail suitable for large rooms with high ceilings. The nails are driven at the top of the arches in the profile to make filling the holes easier and less noticeable in the finish. Apply a thin coat of wood glue at to the contacting edges of the molding and drive the nails into the wall framing. Caulking shouldn't be needed between the trim pieces in this design. This design is created using a large piece of bead or bullnose, a one-piece baseboard and a cove molding. This profile can be installed flat against the wall, as a chair rail, or set out to cap wood wainscoting in a dining room or ceramic tile in a bathroom. A wider bullnose bead will probably be needed when covering thick materials. Install the baseboard first and then add the bullnose followed by the cove. This is similar to the one above but with a groove cut along the top of a large piece of back band that caps the design. The groove will serve as as a stop for displaying decorative plates and similar tchotchkes.

The tail of the profile is created using a large piece or rake mould to give it a little flare. Build this profile by nailing the rake to the framing and then setting the back band along the top. Nail the top piece at an angle into the lower piece and the wall frame using 2 or 2½in finishing nails. Caulk shouldn't be required at the molding joint but the nail holes should be filled before painting. Related Articles on This Site Custom Crown Molding Ideas Door and Window Casing Ideas Building Wide Cornice and Crown 4" strip of medium-density (MDF) board circular saw, jig saw and a table saw construction adhesive and wood glue paint, paintbrush and painter's caulk laser level and standard level 1. Set a laser level to the desired height of the wainscoting. Measure from the laser line down to where the baseboard will fit, based on the height of the wainscoting boards. 2. Cut beadboard to desired height using the circular saw. 3. Mark the wall with the chalk line at the point where the top of the chair rail will sit.

4. Remove your old baseboard. If you are reusing the same baseboard, score the top of it with a utility knife to separate the paint from the wall. This will help prevent the paint from peeling off the baseboard. Use a crowbar to help pull the baseboard off the wall. 5. Many stores sell baseboard that has been precut with notch (rabet cut) in the back that allows the wainscoting panel to easily fit in behind it. If you are using the pre-notched baseboard, cut it to size with a miter saw and attach it to the wall with wood glue and a nail gun. 6. Use the jig saw to cut out areas where the windows and outlets are located on the wall. Use a T-square to ensure straight lines. 7. Affix beadboard to the wall using construction adhesive. Place the level horizontally and vertically against the first piece of wainscoting to make sure it's straight and level. When it is level, nail the wainscoting to the wall. (Nail into the studs whenever possible.) 8. Construct a picture rail to top off the wainscoted wall by first using a table saw to bevel a piece of brick molding.