chair rail molding for bathroom

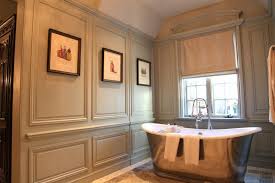
Bath, Construction How-To, Decorating, Remodeling You know the place. It’s the little room where your wife tells you not to use the good towels that match the decor. It’s the one that gets checked before the guests arrive. The powder room, sometimes called the guest bath or half bath, usually contains no bath at all. Located on the first floor or convenient to the living areas, it can be a good candidate for an update. Wainscot can make a nice change to this room, transforming it into a diminutive oasis of tranquility for a momentary respite from the… You see where a little paneling can take you? There are few areas in the house where trades can collide like in a bathroom, which can have a big build list in a small area. Trying to figure out the best sequence to schedule carpenters, plumbers, electricians, tile setters, painters and others can be a challenge for a general contractor. Often compromises must be made to get the job done. The same project for a homeowner can be much easier to schedule, since you will wear the tool belt (or coveralls) of each of these trades.

You can even mix and match partial installations typically done by different trades as the project comes together. For example, you can remove a toilet, do the work that needs to be done under and behind it, then reinstall it before the rest of the room is completed. A real plumber would want to come back to set all of the finish fixtures at once, which could leave you without a pot to… well, you get the idea. We recently tracked a small powder room remodeling project where the work was done by general contractor and jack-of-all-trades Brian Monroe, who had the flexibility to get it done much like a homeowner project. As you will see in the wainscot project, the sequence of different tasks can be quite fluid on this type of job. Pushing ahead to get one part done quickly can get in the way of other necessary tasks if you don’t give thought to the order of operations and how things will tie together. It might be fun to jump right into wainscot paneling, but it can leave you scratching your head on how to transition to the vanity countertop or how to install baseboard that now protrudes past the face of the casing.

As handy as an indoor toilet can be, it’s best to get it out of the way for a wainscot installation. Monroe shuts off and disconnects the water, flushes, removes water from the bowl, disconnects the floor bolts, cuts the caulk, loosens and lifts. After removing the toilet, trim, outlet covers and pedestal sink, Monroe marked a level line around the room at an elevation he knew would be below the chair rail. He used a utility knife to cut the wallpaper along the line. Notice that he did not bother to use a straight edge for this step. This is the cover-up principle in operation. Because the wainscot and chair rail will cover it up, there’s no need to waste time making a perfectly straight line on the wallpaper cut. Before installing the panels, Monroe installed the baseboard. The sequence for this operation depends on the baseboard design and the look you want. In this case, the panels were thin enough that they could rest on the baseboard. This created a more desirable reveal (visible area) on the baseboard tops and eliminated an awkward caulk bead where the flutes of the beadboard panels meet the baseboard.

There are a number of things that can dictate the sequence for installing paneling like this, including stud locations, placing joints where they are hidden, and making adjustments such as scribing on smaller pieces that are easier to handle.
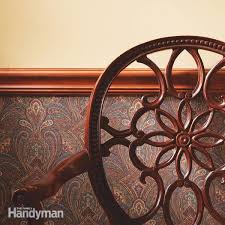
chair rail molding for bathroom With the two larger panels already in place, Monroe can easily handle this smaller piece to fit it just right into the corner. Since it’s best to sneak up on scribe adjustments by taking off a little material, testing it and taking off a little more, working with small pieces makes this process easier and quicker. Affordable Kitchen & Bath offers full line of molding including Baseboards, Crown Mouldings, Casings and Chair Rail. Click to View Accessories Click to View Baseboards Click to View Casings Click to View Crown MoldingHave you ever noticed that in some houses a chair rail looks great, but in other houses it just looks "off" somehow?

That's because there are certain rules of thumb for chair rails that give us that visual sense of being "just right." Many homeowners ignore this completely, and that's why you get an old house that looks strange. I discovered this by accident in an old house many years ago, where the chair rail just seemed to leap away from the wall and annoy me every time I walked into the room. So when I realized I needed a chair rail in my new house, I was determined not to make the same mistake. Chair rails were originally designed to do just what they claimed -- to provide a rail that the back of a chair would hit when it was moved, so that the painted wall or expensive wallpaper wouldn't be marred. But that didn't last long, as fashion and trends took over. Soon chair rails were designed to be a visual point in the room that enhanced the tall ceilings, handsome floors, or other areas that were deemed eye-catching. But it was also a matter of symmetry. We are most comfortable in rooms that fit proportions that appear suitable to the eye.
In fact, much of our understanding of proportion comes from way back in the first century BC, when Roman architect Marcus Vitruvius Pollio determined that a proportional relationship of 1:7 was necessary for harmony in a building. For instance, if a column is 10 inches at the base, it should be 70 inches tall. That's what feels "right" to us -- anything more or less might feel "wrong." And so it is with the chair rail. Now I know that the chair rail in my old house was at a height that made the room look oddly skewed, and that led to my unexplained annoyance every time I looked at it. I was bound and determined that this would not happen in my new house! Determining the right chair rail height Many people think that 36 inches is the proper height of a chair rail in a typical home. But what is typical? Homes don't have a set distance from floor to ceiling these days. In fact, the ceiling height might vary from one room to another. How do you decide where the chair rail goes?
If you are going to create a chair rail that is for decorative purposes only, look to the height of your room to determine the height of the rail. For example, most architects install the chair rail molding at 25 percent of room height. If your room has 10-foot ceilings, the chair rail would look best at about 30 inches from the floor. Other factors might come into play, such as thick crown molding or wide baseboards. In that case, try out your chair rail at different heights for a while to see which appeals most to you. Tough choices in chair rails I tried the 25 percent rule with the chair rail in my house, and guess what? That's because I needed a chair rail for the purpose it was originally intended, which was to prevent scuffing on the wall. That's when tough decisions come into play. Should you simply change the chairs to a different profile that doesn't menace the wall? Or should you opt for a chair rail that is at the "wrong" height? Fortunately, my chair rail was needed only at one part of the wall, which happened to be right between two windows.