wood rocking chair patterns
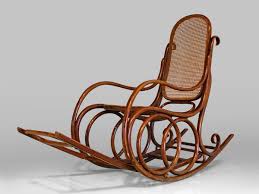
For other uses, see Rocking Chair (disambiguation). A Thonet rocking chair A b or b is a type of chair with two curved bands (also known as rockers) attached to the bottom of the legs, connecting the legs on each side to each other. The rockers contact the floor at only two points, giving the occupant the ability to rock back and forth by shifting their weight or pushing lightly with their feet. [1] [2] Rocking chairs are most commonly made of wood. Some rocking chairs can fold. The word rocking chair comes from the verb to rock. [3] The first known use of the term rocking chair was in 1766. A rocking chair designed by Swedish painter and furniture designer, Karin Bergöö Larsson Rocking chairs are often seen as synonymous with parenting, as the gentle rocking motion can soothe infants. Many adults find rocking chairs soothing because of the gentle motion. Gentle rocking motion has been shown to provide faster onset of sleep than remaining stationary, mimicking the process of a parent rocking a child to sleep.

Rocking chairs are also comfortable because, when a user sits in one without rocking, the chair automatically rocks backward until the sitter's center of gravity is met, thus granting an ergonomic benefit with the occupant kept at an un-stressed position and angle. Varieties of rockers include those mounted on a spring base (or platform) called "platform rockers" and those with swinging braces commonly known as gliders. A photo of man lounging in a rocking chair while reading Though American inventor Benjamin Franklin is sometimes credited with inventing the rocking chair, historians actually trace the rocking chair's origins to North America during the early 18th century, when Franklin was a child. Originally used in gardens, they were simply ordinary chairs with rockers attached. It was in 1725 that early rocking chairs first appeared in England. The production of wicker rocking chairs reached its peak in America during the middle of the 18th century. These wicker rockers, as they were popularly known, were famous for their craftsmanship and creative designs.

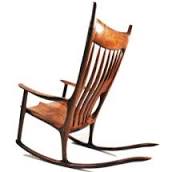
By the 1950s, rocking chairs built by Sam Maloof, an American craftsman, became famous for their durability and deluxe appearance.
ikea high chair cushionMaloof's rocking chairs are distinguished by their ski-shaped rockers.
portable high chair restaurant President John F. Kennedy made the P & P Chair Company's rocking chair famous.
buy swing chair nzIn 1955, Kennedy, who suffered with chronic back problems, was prescribed swimming and the use of a rocking chair by his physician.
designer rocking chair for saleThe President so enjoyed the rocker that, after he was inaugurated in 1961, he took the chair on Air Force One when he traveled around the country and the world.

He bought additional rockers for Camp David and for the Kennedy estates; and he gave them as gifts to friends, family, and heads of state. Kennedy's rocking chair from the White House is on permanent display at the John F. Kennedy Library and Museum. Per the manufacturing design, the Kennedy Rocking Chair is shaped, steam-bent, and assembled while the wood is still "green." Media related to Rocking chairs at Wikimedia CommonsBuild a Sculptured Rocker Plan Bundle PLUS Shaping a Sculptured Rocker DVD Email this page to a friend Add to a new shopping list Build a Sculptured Rocker with Charles Brock DVD, Book and Plans EXTRA $30 VALUE - Shaping a Sculptured Rocker DVD EXTRA $30 VALUE - NEW Companion Bonus Plan Charles Brock's lively 103 minute DVD plus 48-page book with 72 color photos plus two 24" x 48" full-size patterns plus his separate 100 minute DVD on the art of shaping the beautiful contours on your chair plus his NEW companion full-size plans to allow construction of your chair using readily available 8/4 lumber instead of hard-to-find

10/4 lumber all combine to provide you with ALL the knowledge and confidence you need to build your own sculptured rocker. Charles will teach you how to: Choose and order wood for you project Scoop out the deep saddle Craft the unique visible seat-to-leg joinery Shape, sculpt and assemble the flowing headrest, arms and back spindles Laminate and carve the signature laminated rockers Assemble the rocker with the proper glue, screws and plugs Carve, sand and finish the chair to taste, creating a sculptured rocker with a final touch of your own artistry 48 page book with 72 color photos 103 minute rocker DVD 100 minute Shaping a Sculptured Rocker DVD Full-size plans for building the rocker with 8/4 lumber (instead of hard-to-find 10/4 as in the original plan) Charles Brock's Chairmaking Website Our list of sculptured chairmaking tools Notice to residents of California: Please read our Proposition 65 warning.A cushion improves the comfort of a rocking chair.
Rocking not only soothes babies, it is an instinctive behavior that everyone indulges in, which explains the popularity of rocking chairs. Rocking chairs are good for treating arthritis and healing from muscle sprains as they allow small incremental movements while supporting your weight. Increase the comfort of your rocking chair by making a cushion for it, especially if you have a new infant and plan to use the chair frequently. Cut open the paper bag, and lay it flat on the seat of your rocking chair so that it overlaps at all the edges. If you have a very deep rocking chair, you may need to use wider paper or glue two bags together. Draw a perimeter on the paper bag, inside the chair-back spindles and along the edges of the rocking chair. Lay the paper bag on a flat surface, and simplify the outline you drew, smoothing out the area in front of the spindles. Trim away the excess paper from the left side of your paper bag pattern. Fold the bag in half from side to side so that the fold runs from the center of the back to the center of the front of the pattern.
Ensure that the two sides are even and equal. Trim the excess paper from the right side of your paper bag pattern. Lay the pattern on top of the 2-inch foam, and trace around the pattern with a magic marker. Cut the cushion to fit the pattern with a bread knife. Fold your material in half, good sides together, and pin your pattern in the middle of the fabric so that there is at least 1 1/2 inches all around the pattern. Measure 2 inches outside the pattern all around, and mark with pins running parallel to the pattern. This is your material cut line; it leaves space for your cushion height and a generous seam line. Cut the material around the pin line. Remove the outer pins, and reinsert them into the fabric only along the edge of the paper pattern as you go. Remove the pins holding the pattern to the material but not the pins that are outlining the material. Sew a slim 1/2-inch seam around three sides of the cushion cover. Start sewing the seam on the right side; sew across the front and up the left side of your cover.

Remove the pins from the three seamed sides. Turn the cushion cover inside out; insert the foam -- check for the proper orientation so that the wide front edge goes in first. Squeeze the foam to get it properly into the cover. Place the cover on your rocking chair. Mark two places where the spindles meet the rear of the cushion with pins equally spaced from the center. Cut two 1-inch by 12-inch strips of material for your ties. Fold one of the pieces of material in half, lengthwise, right sides together. Sew a seam as close to the edge as possible along the long side and one end. Repeat for the second tie. Hold the pencil with the eraser upright in one hand, and turn the tie right side out by sliding the closed end over the pencil like a paper cover over a straw. Slip the raw end of a tie one inch inside the cushion where it's marked by a pin. Fold 1/2 inch of the cover material to the inside, and sew the tie firmly in place. Close the back of the cushion using a ladder stitch.