wood rocking chair covers

Rain-or Shine Braided Chair Pad Please note: chair pads match outside border only of multi colored rugs. Size of this preview: 493 × 599 pixels. Other resolutions: 197 × 240 pixels | 590 × 717 pixels.
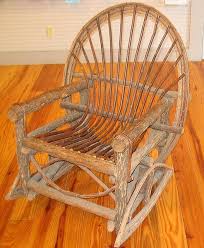
This unusual rocking chair is made of rough wood to give it an old-fashioned look. Click on a date/time to view the file as it appeared at that time. Date/Time Thumbnail Dimensions User Comment current 22:19, 9 October 2004 590 × 717 Quadell Photo by Quadell {{gfdl}} This file contains additional information, probably added from the digital camera or scanner used to create or digitize it. If the file has been modified from its original state, some details may not fully reflect the modified file. Date and time of data generation 11:24, 9 October 2004 File change date and time Y and C positioning Date and time of digitizing Flash fired, auto mode, red-eye reduction mode Focal plane X resolution Focal plane Y resolution

Focal plane resolution unit One-chip color area senso brown - $79.95 USD more about this item... Best Choice Products presents this new Porch Rocking Chair. Get the perfect furniture for relaxing indoors or outdoors with friends and family. This durable rocking chair is constructed with weather-resistant solid hardwood and a cushioned seat. The seat cushion is designed with weather-resistant polyester fabric and stuffed with polyurethane foam. The body features a contemporary design with a sloped seat and curved backrest for maximum comfort and relaxation. Unwind today and purchase this Porch Rocking Chair! Add comfort and a contemporary style to your outdoor or indoor living area Durable rocking chair is constructed with weather-resistant solid hardwood and a cushioned seat Seat cushion is designed with weather-resistant polyester fabric and stuffed with polyurethane foam Body features a contemporary design with a sloped seat and curved backrest for maximum comfort and relaxation
Product Dimensions: 32"(L) x 25"(W) x 38"(H); Weight Capacity: 250 lbs. Product Dimensions: 32"(L) x 25"(W) x 38"(H) Seat Cushion: 19.5"(W) x 20"(L) Backrest: 25"(L) x 20"(W) Weight Capacity: 250 lbs. Chair Material: Solid Hardwood Cushion Material: Weather-resistant spun polyester Assembly required (with instructions) Time: 4 hours or less foam, fabric, matching tread, a needle, push pins, fabric marking pin and a sewing machine. After 5 years and 2 babies, my old rocking chair cushions were tired and lumpy. If I was going to use that old chair, I was going to have to do something about those cushions. I set out to make brand new cushions and covers for my little chair. It was surprisingly easy and it turned out beautiful. Here's how you can do it too. Cut New Foam Cores for the Chair How to Make a Template for New Cushions If you don't have the old cushions, or want to make cushions for a chair that didn't come with a cushion, you'll have a little more work to do.

You'll need to make a template out brown paper bags. Lay the bag onto the chair, pressing into the corners. Trace around the chair's perimeter and cut away the excess paper to make your template. Don't forget to check this template before using it. Cutting New Foam Cores for the Cushions Now that you have your templates, either the old cushions with cover removed or the paper template, take some quick measurements so you know how much foam to buy.
where can i buy a cheap rocking chairIt is fairly expensive so you don't want to buy more than you need.
chair covers northern ireland pricesYou can purchase foam at any craft store.
bistro table and chairs sale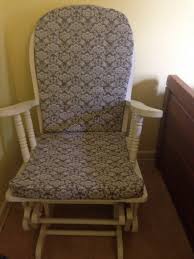
Trying to be economical, I used 2" foam for the seat and 1" for the back, but for a cushier seat, you could use 3" or even 4" foam. Set the old cushion or template on top of the new foam sheet and trace around it. Cut out the cushion using a sharp utility knife or scissors. 1.5" or Thinner Cushions Iron the fabric and fold it in half. Lay the cushion on top and trace around cushion leaving a space about the cushion's width between the cushion and the cut line.
cheap recliner chair cushionsCut out the fabric and center the foam piece between the two layers, right-sides together.
best office chair for under $250Pin the material around three sides of the foam piece, leaving the back open.
outdoor wicker hanging chairs
Take the foam insert out from between the fabric. Using a fabric marking pen, trace around the needles to mark a sew line. Remove the foam insert and sew the pinned sides together, removing the pins as you sew. 2" or Wider Cushions For wider cushions, cut the material as before and pin the right and left sides together, leaving the entire front section, and about 2 inches on each side unpinned.
bean bag chair healthRemove the foam insert and sew only the pinned areas as before.
hairdresser chair rental pricesWith the material still inside out, insert the foam back into the material and check the fit.
wheelchair parts for sale uk Cut a new strip of material about 1.5" wider the cushion depth and long enough to wrap around the sides about 3" on each side.

Pin the strip, right side in, into the foam core. Then, pin the strip's top and bottom to the rest of the cushion material, working around the corners to where the top and bottom pieces of fabric are sown together. Remove the pins that hold the front strip to the foam insert. As before, use a fabric marking pin to trace along the needles to create your sew line, remove the foam core and sew the material together. Click thumbnail to view full-size Finishing the Cushion Insert the foam core back into the material and check that it fits correctly. Trim away the excess material along the seam lines to 1/4 inch. Remove the foam core and turn the material right side out. Replace the foam insert and adjust the material around the foam core. Working on the back end of the cushion, turn the top and bottom material in and pin closed, tucking in the corners. With foam core still in the cover, sew the back closed. Creating Tufting in the Cushions Now, you could call your cushions finished, but this last step is well worth the extra time, giving your cushions a more polished and professional look.

It's called "tufting," and it is creating little indentations in the cushions that help hold the foam in place and keep the cushion material from looking sloppy. It's really easy to do. Use push pins to plan out where you will put the tufting. I did 4 rows of 2 for the back cushion. Thread a needle that is at least as long as your cushion in deep, doubling the thread for strength. Tie a small knot at the end. Push the needle though the cushion, trying to go straight up and down and pull the thread through the material until the knot goes just through the fabric into the foam core. Thread the needle back through the cushion pulling tightly until the cushion just starts to indent. Holding the end of the thread tight, so that the cushion stays compressed, thread the needle back through the cushion, pulling tightly until the cushion compresses even more. Continue this process several more times, creating a little X pattern, keeping enough tension on the thread so that the cushion stays indented.