wood rocking chair base
Stylish upholstered rocking chairs can be expensive so for our son’s nursery we purchased an accent chair, removed the legs, and built our own rocking chair base. In this DIY rocking chair base build tutorial we will show you how we built a custom rocking base for the chair. The rocking chair is a staple piece of furniture in a nursery. It has to be comfortable, functional but let’s face it, it has to look good too. Oh and if you are in rowing in the same boat as us, it has to be affordable. We put a lot of effort in the design of our nursery to blow it on a mismatched rocking chair or blow our whole budget on one we couldn’t really afford.We even went so far as to try out rocking chairs at Pottery Barn Kids. When the nice sales lady asked if we were interested, we played along knowing good and well we couldn’t drop over $1,000 on a chair. If we had the money, I would have taken the one I liked home in a heartbeat. But we don’t so we had to improvise. I feel our DIY projects that turn out the best are ones where the price of a piece of furniture we like is way up here (picture my hand way above my head) and our budget is way down here (picture my other hand below my knees).

It forces us to think up a solution that is a good compromise between style and price. That is what we did for our rocking chair base build and I think it was a home run. We were able to take the exact style accent chair we liked (that was in our price range) and turn it into a rocking chair by building a custom rocking chair base. Watch the video tutorial or following along with the steps below to see our rocking chair base build tutorial.Subscribe to our YouTube channel to see more DIY videos! *This post contains a few affiliate links. You can read our disclosure policy here. 1. To start the rocking chair base build, we first tested the rocker radius by cutting a 38 inch radius from two scrap sheets of masonite and screwing the masonite rockers into the stock legs. We did quite a bit of research and used the formula below to determine the radius. Seat Height(12″) x Pi(3.14) = Rocker Radius (38″) After sitting in chair with the test rocking chair piece, we decided the seat height was a bit too high but the rocking motion was perfect.

Our solution was to shorten the legs on the new rocking chair base. Building the Chair Base 2. The new legs for the rocking chair were cut from 2″x2″ pine boards. We matched the angle of the legs and shortened each leg by 2″. The chair apron is made from 1″x3″ pine boards. The original legs screwed directly into the base of the chair but we attached the legs together using an apron design.
cheap deck chairs ebayThis makes for a stronger base.
cotton chair cover rentalsPlus, we like the aesthetic.
comfy chair for master bedroom 3. We connected the four 1″x3″ apron boards to each leg with two 1-1/4″ pocket hole screws and wood glue.
office chair wheels home depot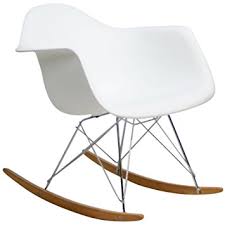
4. Pocket holes were drilled in the top of the left and right apron boards to allow the base to be attached to the underside of the chair. 5. Before moving on to the rocker rails, we test fit the rocking chair base with the upholstered chair and it fit great! Making Rocker Runner Template 6. To trace the rocker runner radius we build a giant compass. Using a scrap piece of aluminum we drilled one hole to anchor one end of the compass and drilled two holes to draw through with a pencil.
metal patio chairs austinOne hole was drilled at 36″ (top of runner) and 38″ (bottom of runner).
office chairs prices in hyderabad 7. To measure where the ends of the rocker runners are, we used the chair base and traced around each leg to indicate where to cut the template to make the ends of each runner flush with the legs.
cheap chair cover rentals in maryland
The rocker runner template fit perfectly! Cutting the Rocker Runners 8. We used select pine 1″x6″ boards for the rocker runners but needed to combine two boards together using wood glue and clamps to match width of the 2″x2″. 9. Once the shape of the rocker runner template is traced on the double thick 1″x6″ board we used a jigsaw to cut out each runner.
iron rocking chairs for sale 10. The runners were attached to the rocking chair base with wood glue and 2″ pocket hole screws after drilling holes to countersink the screw heads.
best office chairs in bangalore 11. To finish up the base we coated it in a acrylic lacquer to preserve the light tone of the pine. 12. Once the clear coat on the base was dry, we attached it to the upholstered chair using 2″ pocket hole screws, making sure they anchored into the wood substructure.
After rocking Connor for three months in this rocking chair, I can confirm that it is super comfortable. The fact that it does not have arms actually makes it more comfortable in my opinion to hold him and feed him because I can lay him on his pillow and it has more room across my lap. In case you were wondering about the sturdiness, I tested it out by rocking Brent on my lap and while my legs felt like they were going to break, the rocking chair did not. It feels safe and secure. It also gives off a smooth rocking motion. We have it on our laminate floor so we added felt strips to the bottom to keep it from scraping and moving too much. Several of our visitors have asked where we purchased our rocking chair which makes us feel good that our accent chair to rocking chair transformation turned out just like we had in mind. Like this idea and want to save it for later? Pin it by hovering over the image and clicking the P.Today’s post brings me great pleasure to share!

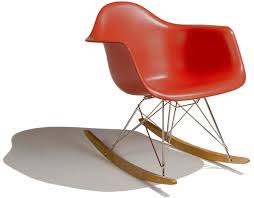
It’s a secret project I’ve been working on since I was 7 weeks pregnant. It is my first DIY project for baby Crowder. (First person to come up with a solid nickname for the IBK Fetus gets a prize!) I’ve always been in love with wingback rockers. You might as well trade your first born child for one, and then, what’s the point?! The rocker on the left came from Nurseryworks, and the rocker on the right is from Pottery Barn Kids. And then, it hit me hard like my pregnant emotions during country music. I could EASILY make my own wingback rocker. All I would need to do is find a wingback chair, and some rocking chair runners. It was so simple. I thought “surely, this has been done a million times.” But I googled it hard, and didn’t find anything on the matter. (But in the Internet’s defense, my googling skillz are weak like a teenage girl at a One Direction concert.) We picked up the Strandmon Wingback chair from IKEA, for $279. I looked online and found a place that sells unfinished wood rocking chair runners.

I order a pair of adult large in maple. We measured where we would need to drill holes for the legs to attach to the runners. The holes need to be 1&1/8″ in diameter. The center of that hole needs to be 7 1/2″ in from each end. The hole needs to be 3/4″ deep. **DISCLAIMER** Double check those measurements by holding up your runners to the legs of the chair to make sure it ‘dry fits.’ It has been brought to my attention that there is variation in the legs of the Strandmon, and my measurements might not be a perfect fit for your chair. We used the drill press at my parents’ house. But if you have a cordless drill, you can use a forstner bit to drill the same kind of hole. My two favorite men! I spent countless hours in this shop, learning the ways of woodworking and DIY from a great teacher. We brought the runners home and fitted them to the chair. Fit like a glove. Now we had to match the runners to the legs of the chair. Instead of painting the runners, I thought it would look better if we stained them black.
I will admit, I did help with staining. BUT I was very careful to not get it on me (and when I did, I scrubbed it right off), and we had all the windows open, with a fan going. Aaron did most of the staining. The wood was so blond, it took several coats. This is how thin it still looked after the first coat. Several coats later, it was looking like a dead match to the legs of the Strandmon. We used a matte poly finish. I love this poly. And it has a soft touch. I don’t know how to explain it, but it is magical. Buy it and try it. After they were dry, it was just a matter of attaching the runners to the chair. We put the runners in place, and drilled a skinny little pilot hole to make sure the wood didn’t crack when we put the screws in. Let’s take a minute to talk about how much Buster loves the chair being upside down. Here’s a montage of Buster in his fort, on several different days. Now that your heart is sufficiently melted, we can get back to the real work.

Then we switched out for a bigger drill bit to make a hole (not all the way down! Just slightly below the surface) the same size of the screw head to counter sink the screw. Then we sanded the bottoms of the feet, and coated the holes in the runners with wood glue. After we put the runners in place, with the wood glue, we use spax screws and secured the runners. We filled the holes with black wood putty. And now, it’s ready to rock. And let me tell you, it rocks like you wouldn’t believe. It’s probably as good as Neil Armstrong’s first steps on the moon. Or when Adele came out of the womb singing her feelings. You sit in this chair, and you just have a good feeling about life. There is no real “skill level” required for this project. It’s just about taking the time to measure. No major tools are required. The simplicity of this project blows me away. This is a DIY project the average person can easily take on. The result is incredible and classy.