white folding chairs home depot
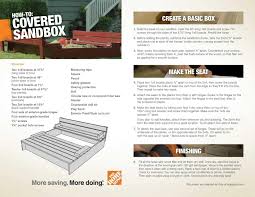
Hi everyone, ChrisFixit with The Home Depot Online community here. In this post we’ll be showing you how to construct a covered sandbox. The cover is a great help in keeping debris out of the sandbox and as a bonus it doubles as seating. The sandbox is very simple to put together and makes for a fun beach like getaway for small children. WHAT YOU NEED FOR THIS JOB: Circular Saw or Compound Miter Saw Two 1x8 boards at 47 1/2" Two 1x8 boards at 46" Four 2x2 boards at 7 1/2" 12 1x4 boards at 47 1/2" Four 2x4 boards at 6 1/2" Four 2x4 boards at 16 1/2" Four sets exterior grade hinges Four exterior grade handles 1 1/4" pocket hole screws First up you will be creating the basic frame for the sandbox. Take the 46” long 1x8 boards and insetting them around 2 to 3 inches from the ends of the 47 ½” long 1x8 boards. Pre-drill your holes and secure the boards with the 1 ¼” screws. For added strength screw one of the 2x2x7 ½” into each of the corners of the frame driving screws from the outside in.

The top of the sand box is made to fold from a covering into a facing set of bench seats. This is done by allowing rows of planks to fold by the use of hinges. I find it very helpful to lay all 12 of the 47 ½” 1x4 planks across the top of the sandbox frame. This will give you an opportunity to get the plank spacing just where you want it, which should be around ½” between planks. With the planks laid out use your pencil to mark out the spacing. Take two of the planks and starting at one end screw them into the frame with ½” (remember to use your marks) spacing in-between. Repeat for the opposite side. Now take another two planks once again spaced ½” apart and screw the 2x4x6 ½” into them edge down. The 2x4x6 ½” will end up forming the armrest of the seats and need to be at least set 1” in from the edges of the planking. Placing the hinges is easiest by attaching them to the seat section first (remember the armrest should be facing down into the frame when doing this) and then to the stationary planks.

When placing hinges remember to adjust your spacing BEFORE screwing the hinges into place, this will help make sure spacing is consistent and functional. Repeat for opposite side. Making the seat backs follows much the same process as the rest of the seat.
indoor swing chair ebayTake two planks spaced ½” apart and screw the 2x4x12 ½” into the planks face down.
stair chair lifts ukThe 2x4”12 ½” should be aligned to be even with the first plank at its top.
chair covers rental cleveland ohioDon’t worry about the overhang as it serves as a support in the seats upright position.
where can i buy a wheelchair in cape town The hinges for this section of seating will be secured from the underside to allow for the seats folding action.
bean bag chairs fancy
As before make sure to check your spacing before attaching the hinges. The handles for the seats can be mounted where ever you find most convenient. Fill all of the screw holes with wood filler and once dry, sand with fine grit sandpaper. Remember when sanding make sure to sand in the direction of the wood grain.
hammock chair stand diyVacuum and wipe the wood clean with a damp cloth before staining or painting. If you intend to stain be sure to test the stain in an inconspicuous area first. When installing your sand box the best option is to remove the grass in the area of your sand box and level out the earth. With that done you can then place a thin layer of gravel (pea pebbles work great) with the sandbox on top. Staple a layer of weed block into the inside of the sandbox and fill with play sand. The gravel underneath the sandbox will assist with water drainage and the weed block helps retain the play sand.

While you can simply place the sandbox in the yard on top of grass you are presented with a couple of possible problems. First up some breeds of grasses could continue to grow up and through the sand overtime. In addition having sand directly on top of grass without a gravel base will make drainage a problem as water will have very few places to escape to. Well folks we hope you enjoyed this project and be sure to check back here at the community often as we continue into the summer. UPDATE: IF YOU'RE LOOKING TO MAKE A BIGGER VERSION OF THE SANDBOX COMMUNITY MEMBER PAUL HAS A POST FURTHER DOWN WITH UPDATED DIMENSIONS AND MATERIALS. BE SURE TO READ COMPLETELY THROUGH HIS POST AS THERE ARE A COUPLE STRUCTURAL CHANGES. Not what you were looking for ? How much does everything cost to build the sandbox. I saw something on the material list that needed to be corrected You have to DOUBLE the 2x4 cut list. So, you need four boards instead of just two They only give you the amount for ONE bench and you are making TWO!

Also: To answer someone's question on the cost of the whole thing. It cost me around $70.00 total. This is making it out of pressure treated material! Hope this information helps others! Thanks for the catch @tdickerson! Updated and passed the information along. With three little ones, I'm also interested in making a larger box, 6x8 as mentioned before or maybe keeps it square with a 6x6. Doesn't matter to me which way the benches run if we went with the 6x8, maybe the 6' side as shorter benches might be easier to maneuver. I would like to avoid a big gap. Any ideas on how to best figure out the adjustments? Some have asked for a bigger version of this sand box. Here is a 6'x8' version, trying to hold true to the original design. Keep in mind, this sand box and the original box above, are meant for younger children. While being a bit more stout in the seating area, beefing up the seat support area should be done for older children. Bench Support - Inner

Bench Support - Middle Bench Support - Outer Box - Long Side Box - Short Side Seat Support - Horizontal Seat Support - Vertical I haven't taken the time to figure out the optimum cutting layout, I'll leave that up to you. Typical 2x4 is 96" long and can be obtained in longer lengths. The 2x2's are also typically 96" long. A few things to point out. The 2x4's on the top of the closed sand box are notched on one end to allow for clearing the hinges. In the pictures above, all of them are notched. This is only because I was too lazy to make different components for the four outer boards. There are square dowels placed along the outer edges of the long sides of the box. These should be the thickness of the closed hinges. They will help support the seat when it is open and allievate stressing the hinge connection. The center 2x2 for the seats is a bit shorter than the others to accomodate the center seat back hinge. There are 12 Tee Hinges in this design to accomodate the longer spans.