where to buy rush for chair seats

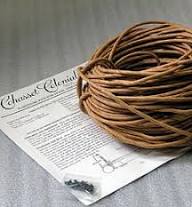
Still Unpacking Boxes - How To Style Bookcases 373rd Inspire Me Tuesday The Update Of The Pool The Story Behind My Antique China CabinetPREPARING THE FIBER RUSH. Fiber rush is packaged in coils of approximately 150 feet. Cut the coil(s) of rush into smaller coils of approximately 30 feet each. To make the fiber rush pliable and easier to weave, dampen it before weaving. Have a pail of warm water on hand. before weaving a coil, dunk it into the water and remove it quickly (10 to 20Shake off any excess. Do not soak or it will become too wet toMost chairs are wider in the front thanIn order to make the opening rectangular, single strands of rush will be woven to fill in the front corners. To determine how far out to weave from the corners, measure the front and back rails. Subtract the length of the back rail from the length of the front rail. Divide the result in half, and measure this distance along the front rail, starting each front post.
pencil line at these points. To begin weaving, tack one end of the coil to the inside of the left side rail near the left front post. rush over and under the rails as shown in Figure 1. Tack the rush to the inside of the right seat rail, close to the right front post, and cut off the excessWhile weaving this and successive rows, pull the rush sufficiently tight to make the corner square at "A". Too great a pull, however will displace the rush making it difficult to keep the corner square. temporarily inserted between the front post and rush at each front inside corner will prevent this displacement in the first row (shown near point "A" in Repeat the procedure as above, tacking the rush at successive points on the inside of the side rails, as shown in Figure 2. corner "A" square while weaving the remaining rows, squeeze the corner between you thumb and forefinger. Check the corners every couple of rows, using a square, and adjust as necessary.
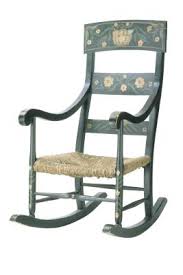
Figure 3 at point "Z". Pull the coil forward over and under the four seat rails in a counterclockwise direction; following the arrows of the first long strand
louis ghost chair set of 4Continue weaving the same pattern over and under the seat rails to
cheap fur bean bag chair the end of the coil.
dining chairs for sale zaLeave a sufficient length of rush to tie on the next coil with a square knot as shown. Locate the knot under the seat between the weaving so it will not be apparent from the top the chair. Use a block of wood and hammer to push rows snugly against one another. To prevent cords from slipping on the rails, drive in a temporary tack on each side as in Figure 3.When your weaving has progressed to the
point shown in Figure 4, tack the last rows temporarily, then remove the temporary tacks previously inserted. Now, is the time to add cardboard fillers to give shape and cushioning to the seat. The fillers can be made from any corrugated carton (the carton you chair kit was shipped in, for example). the fillers to the approximate size and shape shown in figure 4. seats add two layers of filler on each side: for large seats add three layers of filler at each side. Tuck them under the rows of fiber rush as shown.Continue weaving until the side seat rails are covered with rush. Your seat will now look like Figure 5. the seat from loosening while you fill the center section. Secure the last row of rush you have woven, with a temporary tack on the side rail. end up through the opening in the center of the seat. Weave the loose end over and under the front rail, up through the opening, over and under the back rail, and again up through the opening.
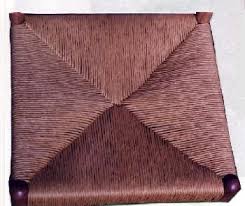
This is known as a "figure eight" pattern. Continue weaving in the "figure" eight pattern until the spaces on the front and rear rails are covered with rush. For best results, the rows should be squeezed together as closely as possible where they go through the slot. by tacking the end of the rush under either the back or front seat rail. Before finishing the seat, take some time to straighten the rows of rush and make them as even as possible. protect the seat and to keep it clean, a finish is required. rush-seated chairs were finished with two or three coats of shellac, thinned in half with wood alcohol. A mixture of solvent based polyurethane, boiled linseed oil, and odorless paint thinner (in equal parts) will also provide a satisfactory and durableTo renew the seat, the finish should be applied every two or three ©Copyright 2001 by Cohasset Colonials®Give new life to your rocker by replacing its worn out rush seat with a fresh new cushioned seat.

Simple wood chairs are a treasure because their looks can be adapted to so many styles of decor. Rush seats can be handsome on Colonial and country-style chairs, but worn rush seats may benefit from a change or replacement. Replacing a rush seat with an upholstered cushion seat is easy, even for beginning DIY decorators. Simple tools and materials give an old favorite chair new life. Cut and pull off worn rush fibers with heavy shears and pliers. Trace an outline of the chair seat on the cardboard. One way to do this is to lay the cardboard on the edge of a flat work surface, and then turn the chair upside down and lay the seat on the cardboard. Measure the dimensions of the chair seat and the size of the tops of the legs where they meet the seat. Trim your cardboard pattern so you can lay it flat on top of the chair seat rails, letting the tops of the legs protrude. Allow 1/8 inch of space at each corner so the newly upholstered cushion will fit close to but not over the tops of the legs.

Trace your pattern on the plywood, and cut it out with the jig- or coping saw. Lay the seat pattern on the 2-inch foam, and cut out a piece of foam 1/8 of an inch larger than the plywood on all sides. Coat the plywood with glue and press the foam down onto it firmly. Working one edge at a time, apply a very thin coat of glue to the vertical edge of the cushion to make a rounded edge. Press down with your fingers or a pencil, holding the pressed edge long enough for glue to set and hold. Continue gluing and holding until you have rounded the edge of the whole cushion. Cut a sheet of foam padding 2 inches wider and longer than the padded seat form. Cover the cushion with foam, wrapping it snugly over the edges of the wood. Staple the foam to the plywood. An easy way to do this is to staple the foam once in the center of each side. This anchors the foam while you gather and staple down the material at each corner. Then staple the edges between the side centers and corners.

Trim away excess foam with scissors. Cut fabric to cover the foam cushioning. Cut a small nick in the hem of the fabric at the middle of the front and back edges. This will help you line up the fabric for stapling over the cushioning and is especially important if you are using a fabric with stripes or other linear patterns. Wrap the fabric over the cushion, lining up the centering nicks by eye. Pulling the fabric firm, staple it to the plywood. Fit the seat cushion onto the chair, and turn the chair with its cushion upside down on the work surface. Drill two evenly spaced screw holes on each of the seat rails, making sure you drill into the plywood but not into the cushion. Fasten the cushion to the chair rails with screws. Trace the cardboard pattern on muslin or other light material to make a bottom cover for the chair seat. Keeping the chair inverted, staple or glue the cover fabric to the bottom of the chair rails. Things You Will Need Heavy shears Jigsaw or hand coping saw