table and chairs under $200

Farm tables seem to be pretty popular this year, so I figured I'd go ahead an build one for our house. After trying to find good deals on reclaimed wood to use, I decided to go the opposite direction and save money by using the cheapest wood, pine. Building the table was also one of the easiest and quickest projects that I've done. The longest part of the build was putting on the clear coat, since I let each coat dry for 24hrs. The actual table top itself was built within a few hours. The final size is 60" long x 36" wide x 30" high. Here's what you'll need to buy: 5 - 2" x 10" x 10' (Actual size is 1.5" x 9.25" x 10') pieces of pine (take your time getting the nicest, and straightest pieces you can). If you can get this in 8' long pieces then go for that. ****If you don't have a table saw then you'll want to get 4 pieces and 2, 2"x4"x8' boards 1 - 1" x 3" x 8' (Actual size is 0.718" x 2.437" x 8') ***Or use scrap wood you have sitting around, this is just for bracing the bottom of the tableQuart of Stain (your choice) Quart of Clear coat (up to you what type of finish you want) A few brushes to apply the stain and clear coat Drop cloth to put under your table top when staining or clear coating (unless you don't care if it drips on
your floor) Sand Paper 60 - 400 grit 12 - 1" Pan head wood screws (to attach the legs) Box of 2.5" wood screws (to build the table top)4-Hairpin Legs (there's a ton to choose from on Etsy) ****You'll have to adjust the sizing and amount of screws depending on what wood you decide to use. It is also to measure and cut along the way instead of doing it all upfront, in case the wood you get or have is slightly different in size. Chop saw or circular saw Table saw (optional) Palm or some sort of powered hand sander A bottle of beer (or a few) Drill Hammer and other random items to distress your table surface. Step 1: Cut Wood Your measurements will change depending on what size you want your table to be. I made mine 60" x 36". Start by cutting 4 of the 2" x 10" pieces to 60" in length. Next take your remaining piece and cut it in 2" strips, using a table saw, this is going to be used for the frame around the bottom of the table. If you don't have a table saw you can use 2" x 4" boards.

The dimensions of all the bracing underneath will need to be adjusted based off which boards you use. I chose to cut my own to make sure all the wood matched. Step 2: Build the Table Top Layout the 4 pieces of wood side by side with whichever side you want to be the bottom, facing up. If you have big enough clamps you can clamp your wood to ensure nothing shifts while working on it, if not then I wouldn't worry too much about it.
chair seat cushions ikeaCut 2 of the 2" strips to the length of your table (60")Using 2.5" wood screws attach these pieces on the bottom side of the table along the length of it.
chairs for sale pier 1Now you'll need to cut the 2" strips so they fit width ways in between the strips you just screwed onto the table.
buy office chair adelaide
Cut two piece of the 1" x 3" x 8' to fit the width inside the frame as well and attach to the bottom using 1.5" screws. You could also use 2" x 4"s for this instead or any scrap wood. ****The pictures of the bottom of the table are after it was finished, I forgot to take some pictures at this point. Step 3: Now for the Fun Part! Flip your table top over and use any type of tools to hit the top of the table, giving it a distressed look.
office chairs to reduce neck painI used different hammers and the bottom of beer bottles.
high chair rental melbourneBe careful not to break the bottles when hitting the table.
patio lounge chair wickerOnce your finished use a palm or orbital sander to sand the top and sides of the table, starting with 60 grit, and work your way to 220 grit.
rio beach chairs website
Step 4: Stain Your Table Use whichever stain you'd like, and brush it onto all the surfaces of your table. The stain really brings out the marks / distressed look you put into the surface and helps the table to not look like cheap pine any more. Step 5: Clear Coat the Table Top After your stain dries, apply multiple coats of clear coat to the table top on all surfaces. I ended up putting on about 5 coats and chose to go with a glossy look.
buy moulded chairs onlineIn between each coat use 400 grit or higher sandpaper to take off any roughness left by the brush or bubbles.
bean bag chairs new york city ***For drying time and the exact grit of sandpaper to use, just follow the instructions on your can of clear coat. Step 6: Attach Your Hairpin Legs Once dry, flip your table over so you can access the bottom to attach the legsTake one of your hairpin legs, and butt it into the corner corner of table.
Attach using 1" pan head wood screws. Repeat with the remaining 3 legs. Once the legs are attached flip your table over and start using it! Photos from Shutterstock and Amazon Make 14 hour editing sessions tolerable by getting your editing workstation in order. Here are some helpful things to have around your editing suite. Note: We’re not sponsored by any of the products or vendors listed below. We encourage you to purchase products at the retailer of your choice! Most video editors I know do their work with just a keyboard and mouse, but there are others, that simply swear by a tablet for a faster and more efficient editing experience. Wacom has made a name in recent years as the go-to manufacturer of pen tablets for creative professionals and their marketing to post-production pros, touting the benefits of better ergonomics, custom button mapping and a more fluid animating process. If using a tablet seems intimidating, you can get in at a lower price point for some of the entry level models under $200.

Give it a try in your editing work. If it sticks, upgrade to the Intuos Pro line and have your starter tablet as an on-the-go solution. For more info on editing and animating with a tablet check out our previous post: Why Use a Wacom Tablet or Stylus for Post Production? When you have a project on multiple hard drives and you already have your mouse or Wacom tablet hogging a port, you are going to need more USB ports. This is especially true when working on a laptop. Expand your USB capabilities with a hub…but avoid cheaply made hubs that likely won’t hold up to long term use (or being tossed around in a backpack). We love these aluminum Mac inspired models: If you’re not editing with a battery backup, I’d guess you haven’t lost hours of your video editing work…yet. It’s a must-have in every editing suite. Uninterruptible power supply (UPS) is just a fancy name for a battery backup. APC is the market leader for UPS units. They will guard your system against power surges and when there is an outage, they can provide ample time to backup your work and shut down your computer.

The main things to look for when purchasing a UPS are the output power capacity and the number of outlets. With many units, not all the outlets have battery backup (some may just provide surge protection). UPS units vary in the amount of power capacity they provide. To calculate the output power capacity you’ll need, you’ll need to determine the average wattage load of your computer system and how long you would want that system to power solely off the UPS. An in-depth post over at HowToGeek does a great job at explaining this in depth with calculations for figuring out how long your computer (and peripherals) could run on various UPS units. It’s worth checking out. Lastly, make sure your clients are covered. If you have a client desk/table in your edit suite it should also have a power strip with surge protection (important distinction!) This stock photography model is obviously not sitting in an ergonomic desk chair! That rolling office chair you found in the dumpster may have been great in college, but when you sit in that chair for too long, strong You don’t need to spend $1000+ on a Herman Miller or Steelcase chair to be comfortable but you do need to take the following things into consideration when chair shopping.

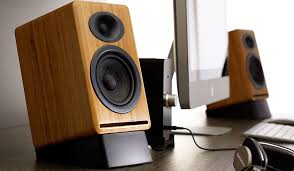
Some video editors spend loads of cash on high-end speakers but miss a key component in their audio setup: speaker stands. A pair of nice stands can: You can get a pair of good stands online for less than $50 – a worthwhile investment for any serious video editor. Image above from AudioEngine USA. Are your headphones still comfortable after wearing them for an hour? What about three hours? If not, look into getting a quality pair you can actually keep on. Avoid consumer focused headphones, like Beats or Skullcandy, which often have over pumped bass. Instead, look for monitoring headphones (also called reference monitors). Video editor and PremiumBeat blogger Jonny Elywn recently did a post on his picks on the best headphone options for film and video editors. For comfort, you will definitely want circumaural headphones – which basically means the pads sit around the earlobe, rather than pressing down on them. Check out Jonny’s post for tons of good options.

Keyboard shortcuts save time when video editing…we know this. But unfortunately it’s difficult to get into a groove using shortcuts (for new video editors) or knowing every shortcut for your application (for experienced video editors). A dedicated video editing shortcut keyboard solves this issue. We’re really digging this new model from EditorsKeys (shown above). Each key is backlit so you can see the shortcut icons in the dark of your editing suite – very useful. Gaff tape isn’t only for on-set. Although pricey, it’s also a versatile product to have around your edit bay. You can use it to label hard drives, tape down and secure any equipment wires, or mark any steps or light switches in your dark edit bay (also called “spiking“). What we love about gaff tape is that it doesn’t leave behind a sticky residue when removed. Every video editor needs a toolbox with extra cables. I’ve been sent hard drives with footage…but without any cables.

Luckily, I keep a variety of extras on hand: problem solved. A few cables I always have: Amazon has their own line of cables and adaptors that are inexpensive and highly reviewed. A mic in an edit suite – why would you need that? Having a decent mic on-hand is a quick way to rough in voiceovers or pick-up audio. For instance, when editing I’ll often record myself reading a voiceover part and add it to the timeline just so I can get a good sense of the timing. There’s no need to wait until you have the final VO track recorded from your voice talent. The Yeti Microphone by Blue is a great choice because it’s verstaile and USB powered (no need for an external audio interface). You can easily change the patterns (Cardioid, Omni, Stereo and Bi) and it comes complete with a little stand that won’t take up a lot of real estate on your desk. Photo from Jamey Beth Hey, it worked for Léon the Professional. It might sound crazy but there have actually been a number of studies in recent years that tout the health benefits of having plants in your work area (reduces stress, improves attentiveness).