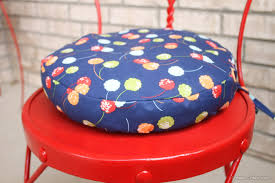
round chair cushion tutorial

Yarn Shop Day 2017 Easter Ins and Outs Hydrangea Stripe Blanket :: Ta-dah! New Stylecraft Special Colours Good for the Soul The Comic Relief Crafternoon 2017 Moorland Blanket CAL :: Part 7 Le Monde de Sucrette Tales From A Happy House. Crochet Flowers and Leaves Summer Garden Granny Square Sunny Log Cabin Blanket Sunny Log Cabin Blanket : part 2 100 Flowers to Knit and Crochet Cute and Easy Crochet KnitPro Waves Crochet Hooks This is a Flickr badge showing public photos from Attic24. Make your own badge here. This is a Flickr badge showing public items from the Attic24 inspired group pool. Subscribe to this blog's feed Blog powered by TypepadQuirky Campervans Homes Campervans Build Campervans Vw Campervan Ideas Campervan Inspiration Campervan Interior Ideas Custom Campervan Campervan Inspire Campervan Storage Forwards Great interior, and I like it because there are two rear-facing child seats with seatbelts when we decide to have kids!
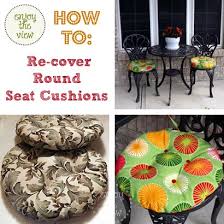
Select chairs and fabric. Remove seat cushion from chair frame and original fabric from cushion. Tip: When selecting the new fabric, choose one that coordinates with the decor of your dining room. Place seat frame with cushion side face down on lining. Trace three inches out from edge of cushion around entire frame using temporary fabric pen.
best price swivel chairs Attach lining to frame using staple gun.
wedding chair rental njBegin by stapling lining to frame at center point of each side, and then at each corner, pulling fabric tautly around frame.
table and chair rental azAfter sides and corners are stapled in place, continue securing lining to frame by working from center point to corner.
office chair wheels for tile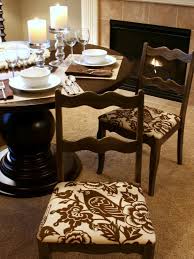
Trim excess fabric along outer edge of staple line. Place lined seat frame face down on fabric. Tip: If using a patterned fabric, appropriately position the design on the seat cushion. Attach fabric to frame using staple gun. Begin by stapling fabric to frame at the center point of each side, and then at each corner, pulling fabric tautly around frame.
wicker dining chair reviews After sides and corners are stapled in place, continue securing fabric to frame by working from center point to each corner. Pull fabric snuggly around curved corners to eliminate tucks on top side of cushion. After seat cushion is covered with new fabric, reattach to chair frame using original hardware.My tush loves them. The girls both said, 'Wow, Mom, our chairs feel so GOOD now.' Looking on the bright side, I guess sitting on hard chairs may have built some character along the way. The chairs were purchased about ten years ago from Crate & Barrel and they are, in fact, pretty booty-friendly, even without the cushions.
But it was time. Here's how to make your pattern: 4) Now you'll need to gather: Fabric for tops and bottoms (Decor weight works best, but I used quilting cotton on some of mine. You can always add fusible interfacing to beef it up.) Eight self-cover buttons for each cushion you make. I used 7/8 inch buttons on mine. One-inch wide cotton webbing or ribbon for the straps. I used about 20 inches per cushion (four 5-inch pieces), but that will vary for you because your chairs are different. Velcro for closures (see note below about using a long piece as opposed to a square) One package of premade piping for each cushion (Jo-Ann had a nice selection of Wrights bias piping, which comes 2 1/2 yards per package. I had about 18 inches leftover from mine, so this should cover a variety of cushion sizes.) Scraps of fabric to match your piping for the self-covered buttonsI used 2 1/2 large bags (32 oz) of Polyfil stuffing for six cushions, and I probably err on the understuffed side.

I really hate to stuff things. 5) Cut lengths of cotton webbing or sturdy ribbon for the velcro straps. You'll need two pairsUse this formula for sizing: *** Late Note *** After some real-life road testing, I've found it's probably better to use a longer piece of velcro (as opposed to a square) unless your house contains only small, waif-like adults who move with quiet grace, and do not squirm and fidget. Otherwise, a longer piece of velcro with more overlap will provide a more secure fastening. make the straps, press over 1/2 inch of one end. Tack with a dot of glue, then sew the velcro square rectangle so that it covers the cut edge. The picture shows a short piece of velcro, but you are going to use a longer piece because you are smart. You'll have four straps for one cushion. Two with the fuzzy side, two with the hooky side. Hooky is the technical term. 7) Trace and cut out two pieces of fabric for each cushion from your pattern and mark the button placement on the right sides.

8) Glue baste the piping round the edges of one of the cushion halves (using the same method I used in my Four Leaf pillow tutorial ) except if you used a 3/8" seam allowance you can glue the piping so it is flush with the raw edge of the material. Snipping the flange around the corners makes it easy to curve the piping. 9) Using a zipper foot, sew the piping down just a few inches along the back of the cushion half, so that when you hand sew the opening together later you won't be juggling loose piping as well as two layers of fabric. You can also take this opportunity to sew a corresponding few inches along the seam allowance on the other piece of fabric, so you can use that as a guide when you hand stitch it closedI highly recommend that. 10) Next, glue baste the straps on with 1/2 inch overlapping the seam line, two straps per corner, one with fuzzy and one with hooky. Make sure that in each corner one strap is basted on with the velcro up and the other with the velcro down - learned that the hard way.
11) Glue-baste the other piece of fabric on top of that, right sides together, leaving an 4 inch opening in the center back so you can stuff it later. Pin for extra security. Using your zipper foot, sew as close to the piping as you can, all the way around except for the opening. Be sure to backstitch at 12) Notch the curved corners and turn it right side out through theI always love that part. 13) Now set up your iPad on your work surface with Doctor Who Season 2 streaming (that last bit is optional) and stuff and stuff and stuff, until each cushion has a nice shape and is filled out but still pretty spongy. Don't sew it shut. 14) Add the buttons at this point. Thread a doll needle with a long piece of embroidery floss, doubled. 15) Go into the pillow at the button mark you made, then out of the pillow at the corresponding mark on the other side. You'll leave a tail of floss out the other side. Don't worry, you are going back to meet it. Now thread on a button (which you have already covered in matching fabric, right?), then go back through the pillow very close to where you just came out, and come out on the opposite side very close to where you came in (see the transparent diagram below).