red patio chairs home depot

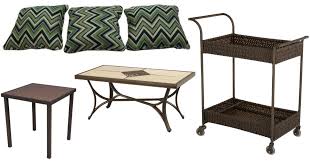
Step 1: Replacing the Worn Sling Step 2: Measure and Calculate Step 3: Cut, Paint, Drill and Counter Sink Step 4: Screw the Slats in Place Step 5: Sit and Enjoy Join the Hip2Save Family Sign up for our newsletter More Home Depot Deals The links in the post below may be affiliate links. Read the full disclosure. where they are offering up huge discounts on select Hampton Bay patio furniture itemsEven better, many of the items have FREE shipping or FREE ship to store options available. Here are a few deals I spotted… Carol Stream Accessory Patio Pillows Only $34.75 shipped (reg. $139)Square Patio Bistro Table Only $24.75 shipped (reg. $99) Carleton Place Patio Bar Cart Table Only $79.60 shipped (reg. $199) Pembrey Patio Coffee Table Only $79.50 shipped (reg. $159) Head HERE for even more patio furniture deals! Sign up and start saving! It's free and easy. Already have an account? Click here to login.
What is the HIP List? Have you ever had moments when you're either out of time or out of printer ink, or both, and you really want to keep track of a "Hip" deal or print a valuable coupon in the next day or two? Or what do you do when an outstanding, but pricey, deal is posted and you want to save it for discussion with your significant other?
office chairs online brisbaneWell, now you're in luck!
office desk chair slipcoverNo more searching through pages of posts to find the coupon or the deal.
folding deck chairs canadaSimply add the post to your HIP List and access it at your convenience.
patio chair covers target
How Does the HIP List Work?Whenever you find a great deal that you want to come back later to, just click on the HIP List icon located on each post (see images below) and the information will be saved in your account. When logged into your account, you will then see your HIP List on every page.
teal accent chair target If you're wanting to print a certain deal, article, or the Weekly Store Matchups from your HIP list, click on the small blue printer icon in the upper right corner of the HIP list.
electric lift chair nzThat will allow you to customize the information that you want or don't want to include in your HIP list so you're only printing the information that's most important to you!
wood dining chair toronto If there are deals that you are not interested in keeping on your list, just click on the minus button to remove it.
occasional chairs uk sale
Now, just print your customized HIP list whenever you're ready to go shopping and snag some "Hip" deals!DETROIT - Home Depot is responding to some fall hazards involving about 2 million swivel chairs sold exclusively at the home repair retail chain. The recall involves swivel chairs under several brand names, including Hampton Bay Anselmo, Calabria, Dana Point and Martha Stewart Living-branded patio chairs.
wicker dining chair covers There have been 25 reports of the base of the chairs breaking, resulting in bruising and scrapes from falls. Consumers should stop using the chairs and contact the manufacturer, Casual Living Worldwide, for a free repair kit. You should not use the chairs until you have made the repairs. from January 2007 through February 2016. , and click on “Recall Information” for more information. For more information from the U.S. Consumer Producer Safety Commission, click here.

Sign up for ClickOnDetroit breaking news alerts and email newsletters Copyright 2017 by WDIV ClickOnDetroit - All rights reserved.Get Home Depot Promo Codes Includes Today's Best Offers email. terms of service and privacy policy Expired and Not Verified Home Depot Promo Codes & Offers These offers have not been verified to work. They are either expired or are not currently valid. 6-pack Solar LED Pathway Outdoor Light select Blinds & Shades select Custom Blinds & Shades select Dewalt & Porter Cable Woodworking Tools Levolor Custom Blinds & Shades The latest sale and newly discounted products from Home Depot updated 2 mins ago.How to use Home Depot coupons and promo codes: Click on your shopping bag to see your current order and enter your Home Depot account information, or checkout as a guest. Click on "Have a Promo Code?" on the checkout page. Paste or type your Home Depot promo code from the list below in the Promo Code box, and click "Apply."

View Home Depot DealsIf you are wanting to build great looking chairs for your patio you’ve come to the right place. I bought a home late last year and didn’t have any patio furniture whatsoever. My dad had built a beautiful piece for their home and so I credit him with design help and the inspiration to build my own. This setup is perfect for enjoying a relaxing evening out on the deck with friends or family. I built my chairs out of cedar because cedar does not rot and stands up against the outdoor elements quite well. You can use pine as long as it is painted or coated with a thick finish of poly. Please note that many of the links in this post are affiliate links which means I’ll get a small commission if you purchase any of the tools using them. This is what helps support the website so I can continue making free plans for you. /AMAZON will help support the site. So thank you for your support! Dewalt 12″ miter saw Dewalt 18 Volt Drill Approximate Cost of Lumber – $125

Click HERE or on the image below for the downloadable Double Chair Bench Plans. These plans are 100% free and you have the option to donate at the time of download to help support DIY PETE so he can devote more time in creating FREE video tutorials and plans for you. This is 100% optional of course! If you’d like them for FREE simply enter “0” in the dollar amount Cheers! The shopping list is provided in the FREE plans. The project is made out of 2×6, 1×6, 2×4, and 1×4 boards. All of the supplies can be found at your local Home Depot building supply store. Cut each piece on your miter saw. For all angles in this project, set the saw to 15 degrees. If you don’t have a miter saw you can find one here. I use a Dewalt 12″ miter saw for all of my projects. Download the FREE PLANS HERE! Use a jigsaw to cut out the notch on the two front legs. The 2×6 piece will eventually rest in the notch. Measure 9 1/2 inches up from the bottom of the 2×4 front leg and mark.

Measure 1 1/2″ back (depth). Then measure from your nine inch mark up 5 1/2″ and make one more mark. Connect the lines and cut out your notch on both pieces. Next, grab a role of tape to make your rounded corners for the arms and back supports. Do a rounded corner for the two outside armrests, and for both outside pieces of the table top. Create rounded corners for the top of the backrest supports as well(Part H). Cut with a jigsaw and use an orbital sander to smooth the edges. Check out photos in later parts of the project to see the rounded edges. As shown in the video, attach the front and rear leg together on the top with the arm support 2×4. Measure 11″ back from the rear of the front leg and put a mark. Then line up the rear leg so that the 15 degree angle sits flush with the arm support. Attach with 2 1/2″ Deck Screws. Use the star (torx) deck screws instead of philips because they are much easier to use and don’t strip. Only attach the two legs to the arm support in this step.

We’ll get to the lower cross support later. Measure 11 inches from the back of the front leg to the front of the back leg. Flush it up with the horizontal 2×4 and attach with 3 screws. Here is another look at how the sides will look when completed. To attach the sides, drill 3 holes from the back of the front legs into the 2×6. Make sure to drill pilot holes. Measure 8 inches up from the bottom of the rear leg. Please see the video if you have questions. This is one of the most tricky steps to try and explain. Use three 3″ Deck Screws to attach. Fasten to both sides. (Drill from the outside leg into the 2×4 rear support.) You will attach the cross supports on each end to the chair sides and rear support. The two middle supports will attach with 2 screws from the front and to the rear support as well. Fasten the cross support with 2 or three screws to the chair sides as shown. You’ll notice the back of the cross support (with the 15 degree angle) sits flush on the rear support and the inside angle extends about 1/4 inch past the rear support.

Attach each cross support. For the middle 2 you can drive 2 screws in from the front side. (Through the 2×6 and into the cross support.). To attach the rear side of the support drill a pilot hole through the side of the cross support at an angle down into the rear support. It will keep it in place and later steps will solidify the joint. Fasten to the sides with 2.5″ screws. Flush up the bottom with the 15 degree angle. The upper support arm bottom corner will be flush with the back side of the backrest support. Attach the front slat so that it hangs over the front 2×6 by 3/4″. Then attach the rear slat so it touches the two backrest supports. Attach the remaining 3 slats and space them evenly apart. (About 1/4 or so). These boards are 20.5″ wide. Next, attach the backrest slats. These boards are 19″ wide. Attach the top board first to help square up the backrest supports. Then attach the bottom slat. Finally, attach the remaining boards and space evenly.

Attach the two 14″ 1×4 slats to the front 2×6 using 2″ deck screws. Then connect the two on top with a 17″ long 2×4. Attach the 15.5″ 1×4 slats to for the back table support. Flush the bottom of the slat up with the bottom of the 2×4 rear support. Then connect the tops of the slats with two 17″ 2×4’s. The second 2×4 is used to connect the chairs to the table for extra support. Attach the two middle backrest supports to the 17″ 2×4 table support. This will strengthen the entire piece of furniture. Use two 3″ deck screws on each side. For the table, attach the 3 1×6 boards with 2″ deck screws. The edges will line up flush with the 17″ 2×4 table supports underneath. Fill all the screw holes with wood putty. The screws need to be countersunk in order to fill them. Spread putty into the screw hole with your finger. You will sand off the excess later. Once the putty is dry ( a few hours ), sand around each hole to clean off excess putty.

Once sanded, the filled holes will look like the photo below. Use a broom or rag to clean off sawdust prior to finishing. Here is a photo of what it will look like prior to the urethane finish. I like to use Minwax Spar Urethane. It enhances the natural beauty of cedar and protect the wood against the outdoor elements. Apply 2 coats of Urethane with a brush. Let the second coat dry completely (6-12 hours), then lightly sand the armrests, table, and areas you come in contact with when sitting (chair slats). This light sanding with 220 grit paper will remove any dust particles that settled in the first coat. Next, take a clean cloth and wipe a thin coat of poly on all the areas you sanded. This will give you a nice smooth finish. Once dry, enjoy your new furniture and have a barbecue! Please Pin if you like this project! Simply hover on any photo then click on the Pin it button that pops up. Thanks so much for checking out my tutorial! I hope it inspires you to build some patio furniture and that you enjoy it for years to come.