office chair base staples
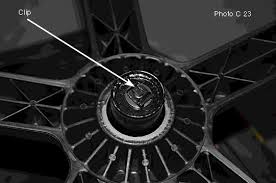
ABOUT US - PRODUCTS LOCATOR - SOLUTIONS - CONTACT US - UPS ARRIVAL DATE - INTERNATIONAL SHIPPING - TERMS and INFORMATION You need to first remove the base. or Choose a project below. See How to remove and install a Gas See Parts of a bearing kit with schematic for installing or replacing See How to measure to replace a gas cylinder (Read below) How to remove and install a gas cylinder (Read below) How to remove and install a gas column (Read below) Start here--Base Removal ( Required to measure a cylinder ) First turn the chair up-side-down so that the in the center of the base bottom underside can be seen. Spread newspapers on floor to prevent greasy falling parts from causing stains With a screw driver or needle nose pliers, lift up the holding clip upper portion only from the piston rod tip Withdraw the base while pulling and turning. The base will easily remove from the gas cylinder most likely pulling with it (hidden inside) the 2 washers and ball bearing.

Set these parts aside to be reinstalled with the replacement base. There should be 4 small parts. If not, look inside the withdrawn column for the remaining part(s) where usually you will find a washer at the bottom. Installation and bearing kit information A replacement Gas Cylinder cannot be measured properly unless the base has first been removed. To install or replace a base, first replace the rubber cushion onto the piston rod, pushing it as far up as it will go. Then the large washer, then a lightly greased bearing and lastly, the other large washer. Wipe off greasy hands on the gas cylinder body. Now, slip the base with hub column up onto the gas cylinder. The remaining small washer and clip are then lastly installed onto the protruding piston rod end at the outside bottom of the hub column. These six small parts can all be easily replaced using our very low cost bearing kit #108 with printed schematic. Abacus uncommonly includes a new column (AKA standpipe) with a new replacement base.

We recommend you use this new column. This is especially important if your chair has a lot of milage on it, as the plastic part inside the the steel column near the top supporting the gas cylinder is may be worn or perhaps cracked, loose or broken. All of which will cause your chair to annoyingly rock and wobble while in use. To remove the column which often appears that it does not remove, read this. A standard size Gas lift Cylinder diameter is 1.102". For quick reference, it is a little over 1 1/16" and a little less than 1 1/8". These will not fit chair manufacturers, Haworth, Vecta and Knoll whose cylinder diameter is closer to 3/4". Standard size will not fit Haworth, Vecta, Knoll, Steelcase & some Herman Miller having cylinder diameters close to 3/4". These exceptions are available only through special order. There are 2 methods (Click on image method wanted) Plumbers Pipe wrench-Longer is easier Lift-Off ® cylinder removal tool Information and $6.50 RENTAL
It will be either 1 3/4" (45mm) or 2" (50mm). No others are available. After removing the base, squirt a shot or two of WD 40 at the underside of the base where the Column protrudes out the bottom. Aim where the Column and Base meet. Turn Base over and repeat at the topside of the Base and Column. The WD 40 must run down entering the tight fitting tapered joint to facilitate removal. Encourage this by sharply striking the side of the Column from 4 directions using a short length of 2" x 4" (14" to 18" will do very nicely) or a steel hammer. The idea is to "Shock" the Column setting up a vibration which will permit the WD 40 to run into the joint. Set the Base and Column aside for 5-10 minutes to permit the fluid to penetrate into the joint. Then, with Base and Column underside facing you and using a steel hammer, strike out the protruding column with medium/hard blows. It may take several blows before it removes. Do not use a mallet! Nine out of ten columns can be removed in this manner...sooner or later.