make a bean bag chair instructions
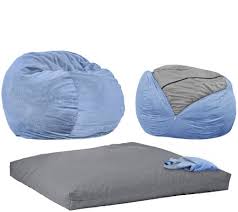
G.I.L.I. got it love it Joan Rivers Classics Collection Linea by Louis Dell'Olio LOGO by Lori Goldstein Laptop Bags & Cases View All Tech Cases & Accessories My Saint My Hero WEN by Chaz Dean GPS Navigation & Car Tech Cases & Accessories Beats by Dr. Dre All For The Home Clearance Home Projects & Tools ED On Air by Ellen DeGeneres Food of the Month In the Kitchen with David In the Kitchen with Mary Fitness Equipment & DVDs Health & Fitness Clearance Sunny Health & Fitness Fertilizers & Weed Control Plants, Bulbs & Trees Liz Claiborne New York CordaRoy's Full Size Convertible Bean Bag Chair by Lori Greiner Perfect for sleepovers at grandma's or lounging in the family room, this super-soft chenille bean bag chair converts from a cozy seat to a full-sized bed big enough to sleep two kids or one adult when the cover is removed. Supportive foam cradles and conforms to your body in either mode, making it the best seat in the house.

See Foam Guide above. Plush chenille coverFully adjustable foam fillConverts from a seat to a full-size bed when cover is removedAccommodates two adults or two children comfortablyLiner features interlocking zippersAs seen on ABC's Shark Tank, Season 4Approximate measurements: Chair 3-1/2'Diam; Bed 54"L x 75"W x 8"D; weighs 36 lbsCover 100% polyesterInner liner 65% cotton/35% polyester; fill 100% polyurethane foamCover: machine wash, tumble dryMade in USAмастер-класс (+1) сообщ - Кресло мешок своими руками | Easy self draft bean bag pattern with great instructions. No messy PDF printing involved! Owl Quilt Pattern | if you liked this pattern you may also enjoy my tutorial and pattern ... bean bag tutorial... for the one who prefer custom stuff... like me :) Free pattern and tutorial: Baby and toddler bean bag | Bean bags can be used to promote so many areas of development! Learn how to make these no-sew bean bags in just a few minutes ... plus learn lots of bean bag activities you can do with kids to develop skills like hand-eye coordination, core strength, body awareness, and more!

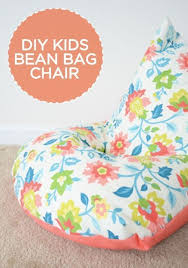
Bean Bag Chair - free sewing pattern. These are great for playrooms or just hanging out with the family on the deck or porch! How to Make a Pyramid Beanbag Chair This project is perfect for a beginner sewer to take her skills to the next level by inserting a zipper. Using leftover fabric scraps and polyester stuffing instead of the usual bean bag beans, it's also very affordable. Because the chair is just a rectangle, the size is easily adaptable for children or adults. Super easy to wash, too! Crochet Chicken Pattern ... Little Chick Bean Bag Pattern Crochet Chicken Pattern ... Little Chick Bean Bag Pattern | Bean Bag Chair Pattern to Help You Relax in Style Instructions to make my girl her very own bean bag for my apartment lol. It will have the initials G.E.T. :) DIY: Sew a Kids Bean Bag Chair in 30 Minutes Make a bean bag chair that’s as unique as your child. With just two pieces of fabric, a zipper, and a straight stitch, you can create a kid’s bean bag chair in just 30 minutes.
It makes the perfect spot for lounging or curling up with a good book, and it’s just the right size for your little one. , plus baby essentials, exclusive brand offers, and more. Burda bean bag pattern #8373 Своими руками puf MásLittle Chick Bean Bag Pattern - Petals to Picots Child Size Bean Bag Chair -DIY Video Tutorial - Crafty Gemini FREE SHIPPING sitewide for a limited time only! Continental U.S. - Orders over $100.
chair and a half with ottoman sale Watch our Demonstration Videos for more help.
buy vintage leather armchair Your Home Is Our Home
wood bistro chairs for sale How to Vacuum Pack
used dental chairs in uk
The perfect place to relax after a long day of nothing but go-go-go 4 feet tall and over 2 feet wide! A ThinkGeek Creation and Exclusive. Item will bill upon shipment. ( no ETA available ) Note: This item is excluded from shipping promotions. Note: This item is excluded from site wide discounts.We just added this to a new wish list for you! You can tell us a bit more about this wish list if you want below.
baby bouncer chair second handIf not, we'll fill in some details for you until you're ready.
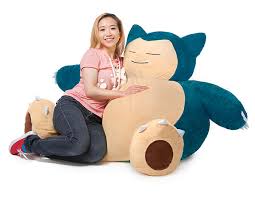
cheap high chairs walmart Your Wish List's Name A Brief Description of Your Wish List Make this wish list public so friends and family can find it Make this wish list my default wish list Save This New Wish List I'm good, I'll do this later In this world of nothing but go-go-go, we often feel like Snorlax is more our speed.

It spends most of its time sleeping. It's not picky about leftovers, and it seldom exercises. There's nowhere better to relax after a long day of work, school, or just being out and about than on your Pokémon Snorlax Bean Bag Chair. At 4 feet head to toe and over 2 feet across, this (s)lumbering Pokémon is perfect for your dorm room, your den, your bedroom, or right inside the door where you can collapse on it when you get in. Just remember not to block the road. It does not ship with a flute. Pokémon Snorlax Bean Bag Chair A ThinkGeek creation & exclusive Materials: 100 polyester on the outside, filled with cotton and polyester fiber mix and polystyrene balls Care Instructions: Hand wash cold. Dimensions: 40" wide x 48" tall x 16" deep (YMMV depending on how it's sitting - it's a beanbag) Timmy and the TG Staff think you'll like...Remember how I mentioned I’ve been on a DIY kick lately, brought on by my illness-induced antsy-ness and disinterest in food?

Well, one night recently it drove me to the internet, where I got stuck for hours on a single website. (I fell way down that rabbit hole!) I bookmarked tons of projects, but the one that compelled me to actually make something right away, was a pattern for a bean bag chair. (Do you ever find that while the internet is a great resource, you often have time to either do a project or read about one, but not both? I wish we could buy an iTunes gift card for our own time.) Anyway, the pattern was designed by a sewing blogger. You can find it here. She calls it a Rollie Pollie, and it’s marvelous. It does cost $8, which gave me pause. I have grown accustomed to getting things for free on the internet, but I eventually realized that I wouldn’t bat an eye at a corporation charging for a pattern, and I was actually much happier to support an entrepreneur instead. So I ponied up the money and am so glad I did. The pattern requires advanced-beginner to intermediate sewing skills, and about 12 hours of time (if you’re rusty like me).

The pattern is delivered via email and prints onto 8 ½ by 11 paper, which you then tape together (see my tips below) and use to cut out your fabric. The pattern instructions are detailed, and the comments on the blog entry are informative, too. One reader’s comment got me to think outside the box about how to stuff the Rollie Pollie. I wasn’t too keen on spending nearly $50 for polyester fill, for reasons of thrift and environmental concern. Also, to be honest, I was impatient. I didn’t want to wait the week it would take to have the stuffing delivered. So, while standing in the garage trying to remember what I went out there for, I noticed our sleeping bags, which have never found a proper home. Then and there I decided to stuff the Rollie Pollie with soft odds and ends we had lying around: extra cushions, guest pillows, a couple stuffed animals, and those very same sleeping bags. Now our Rollie Pollie provides my son with a comfy place to read and go bonkers, all while providing storage for items that otherwise float around our home without finding one of their own.
However you decide to fill the Rollie Pollie, the pattern calls for an insert and a slip cover (so basically you sew two covers). This design is super practical as you can remove and wash the cover as needed. Good thinking, if it’s meant for kids. The cover material I chose is fabric I bought in Nigeria years ago that is intended for traditional women’s dresses. It’s a mid to heavyweight cotton. I love how the bold pattern, alternating the panels, really stands out on the Rollie Pollie. Ikea has a lot of great options, too. In case you decide to make your own Rollie Pollie, and I highly encourage you to do so, I’ve added a few tips and comments on the process here. Join the internal corners first, then the places where the pattern pieces meet. That is, don’t bother taping the outer edges of the pages together – you’re just going to cut them off. Focus on connecting the spots where you’ll cut the pattern out (i.e., across the point where the arrows meet), so the papers remain attached after cutting them.
If you use extra pillows, etc… like I did, you’re probably going to want to be able to remove them from the Rollie Pollie when you need to use them. For that reason, I altered the pattern to include an opening in the insert, too. I gave it a Velcro closure (honestly, because I didn’t have a zipper on hand). The open-able insert also makes stuffing the Rollie Pollie a lot easier, since you’re adding only one item at a time instead of wrestling to get the entire thing inside the slip cover. You’ll see what I mean if you buy the pattern. No doubt the traditional fill would make a softer and lighter Rollie Pollie (mine weights quite a bit). I may eventually upgrade the filling to the Cluster Stuff the designer recommends. ), and you’ll need 9-10 bags for a large Rollie Pollie. A pretty good deal, too, considering. The pattern instructions give good guidance on the type of fabric to use. I will just add a comment about the fabric pattern. The blog entry shows pictures of four different Rollie Pollies, so you can get a feel for whether you prefer a solid or a pattern, a small print or a bold one.

In addition, I think it’s worth it to lay the fabric you’re considering over something vaguely shaped like a bean bag so you can visualize how it will look on the final product. Initially, I spread seven options flat on the couch and was least excited about the one I eventually chose. Once I draped the options over a large round pillow, I could see immediately that my preferred fabrics were much too subtle for a bean bag chair. Thus, my least favorite option (initially) became my first choice for the Rollie Pollie. I used a 24″ sport zipper with large plastic teeth. It’s not as fine looking at the lovely ones shown in the pattern, but it’s a fun color and I figure will hold up better to the abuse it will surely take over time. And even thought it’s chunky it is still pretty invisible once completed. I do think it’s worth shoring up the ends of the zippers for extra security. I just winged it with a couple of boxes going back and forth with a zigzag stitch (leaving a gap where the zipper crosses).