ladder back chairs plans
1×6 @ 3 feet long 1 – 2×2 @ 8 feet long 1 – 1×4 @6 feet long 1 – 1×2 @ 8 feet long 1 – 2×4 @ stud or 8 feet length 1 – 1/2″ scrap plywood for seat top, 19″ x 19″ 1 yard of fabric 1 piece of foam, 19″ x 19″ 1″ thick 1 1/4″ pocket hole screws 2 – 2×4 @ 38 1/4″ (Chair back legs) 2 – 1×4 @ 17 1/2″ (Side Aprons) 2 – 2×2 @ 17 1/4″ (Front Legs) 2 – 1×4 @ 16″ (Front/Back Aprons) 4 – 2×2 @ 4″ (Supports – both ends cut at 45 degrees off square, NOT parallel to each other) 1 – 1×2 @ 16″ (Seat Back Top) 2 – 1×6 @ 16″ (Seat Back) 2 – 1×2 @ 19″ (Longest point, one end cut at 8 degrees off square) 1 – 1×2 @ 16 3/4″ (Center Support) 1/2″ plywood @ 19″ x 19″ (Seat top) If you follow these steps carefully, you can cut back legs that are straight and symmetrically to each other. Mark the legs as shown in the diagram. The front – where the chair leg connects to the side aprons – needs to be cut in 1/4″ to account for rounded edges on 2x4s.

The goal is to make as many cuts as possible with a circular saw, but you will need to finish inside cuts on the back with a jigsaw. Follow the diagram above carefully. I advise taking the scrap piece of 2×4 and cutting a leg first from it to get some practice. Once your legs are cut, lay them together, and check to make sure that the top, bottom and front sides all match. The other parts are not as significant. Sand your cuts smooth. Attach the side aprons to the back legs, flush to the bottom of the front cuts on your chair back legs. Make sure the two leg pieces still match up – if not, your chair is going to be crooked! Attach the front legs to the side aprons as shown above. The tops are flush, and your chair part should match up at this point. Attach the front and back aprons, carefully predrilling. I used pocket hole screws and glue. The cross supports will not only add strength to your chair, but it gives you something to screw your seat to. Attach the seat back top as shown above.

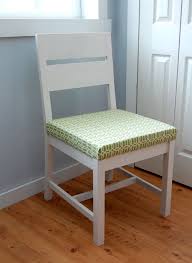
I used pocket holes from the back but you can also use predrilled screws from the legs. Attach as shown above. The base supports will add considerable strength to your chairs. Attach the base center to the sides as shown in the diagram above. Spray glue the seat cushion to the seat top plywood. Lay fabric facedown on table with seat top on top of fabric, foam side down. Staple fabric carefully to the underside of the chair, tucking corners neatly. Use 2″ screws to attach the seat to the cross supports or use pocket hole screws. This chair was painted with Valspar Antique White in Flat Enamel, three coats. A top coat (Valspar satin finish poly) was added. The fabric is from Joanns, and is part of the Home Decorator’s 45″ wide fabric, and was on sale for $5 a yard. For a foam pad, I used a discarded chair pad cut to size. Total cost of this chair was under $20. Chairs dining room Beginner Cottage Style Furniture PlansWoodworking Project Plans from the Editors of Magazine

Building chairs: just the thought of it brings out a certain uneasiness in many woodworkers. At first, the curved back leg and back slats may seem a little intimidating. But they’re fairly easy to cut by using a template to rough out the shape on a band saw. Then you can use the same template to smooth them on a router table. Woodworking is not the only challenge when building a chair. You also have to upholster the seat and this plan includes step-by-step directions to help you.
throne chairs for sale in australiaBut the thing I like most about this chair is sitting in it.
used electric leather recliner chairs for saleThe curved back fits a body’s shape nicely.
used office chairs cleveland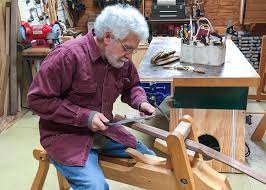
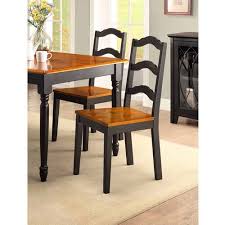
And it’s a comfortable angle — straight enough for eating, yet comfortable for sitting. These chairs have a matching table. See the Dining Table plan. 11 pages of step-by-step instructions 60 full-color photos and illustrations Cutting diagrams and materials list Patterns for the curved parts Shop-tested guarantee from the editors of Woodsmith magazine 17 3/16"W x 18 3/4"D x 38"H This Woodsmith Plan is a downloadable PDF file that you save to your computer after you complete your order.
chair and table rentals mobile alCute Curtains Patterned Curtains Curtains For Kitchen Kitchen Windows Relaxed Roman Shade Spa Tub Window Coverings Window Treatments White Fabrics Forward The secret to a well-dressed window?
cheap folding chairs bulkDetails, details, details - that and a fabulous curated material collection.
massage chair price south africa
With 900+ choices, you’re sure to find the perfect look for your windows. Order your free swatches today, and receive them in 1-3 business days. Shop online or visit one of our nationwide showrooms.Learn the craft of ladderback chairmaking Each six day class will take you, step-by-step, through the process of hand crafting a Brian Boggs designed chair. They cover every aspect of making a ladderback chair, beginning with lumber selection all the way through final assembly using hide glue.
giant deck chair uk Introductory chair classes The introductory classes are open to woodworkers of any skill level.
folding chairs for horse showsIn a step-by-step manner, they will introduce you to all the processes and techniques needed to make a ladderback chair and are also designed to teach you the underlying principles of chair geometry and construction.
home cinema chairs south africa
Learn more about the Post & Rung Side Chair Class or the Arm Chair Class Advanced chair Classes The advanced classes build on the skills and ideas taught in the introductory classes by working, step-by-step, on ladderback chairs with more complex construction. They also introduce methods of working used in production chair shops. These classes are open to woodworkers who have taken one of the introductory classes or taken a class with Brian in the past. Learn more about the Classic Side Chair Class, the Classic Bar Stool Class or the Rocking Chair Class The Class Experience Hear what students have to say about their chair class experience. Follow two students through a six-day class. Build a ladderback chair in seven days Each class takes you step-by-step through the process of hand crafting a Brian Boggs designed chair. They cover every aspect of making a ladderback chair, beginning with lumber selection all the way through final assembly using hide glue. Because class size is limited to three students, you get personalized instruction and can work at your own pace.
Every process is broken down into small, manageable steps so that you can concentrate on mastering one task at a time before moving onto the next. Whenever a new process is introduced, especially when hand shaping parts, you are given the opportunity to practice on spare material before working on your actual chair part. In addition to showing you how, I always explain why, so that you will understand underlying concepts and how each step fits into the big picture. The classes cover many aspects of making a ladderback chair including: Steam bending Hand shaping parts using a drawknife, spokeshave and scraper Working with angles and curved parts Using moisture content and grain orientation to make a long-lasting joint Assembly using hide glue Weaving a hickory bark seat Class manual Each class includes an 80+ page, fully illustrated manual, that documents the process for building your chair from beginning to end. It serves as a step-by-step reminder of the steps taught in class.