ladder back chair class
Learn the craft of ladderback chairmaking Each six day class will take you, step-by-step, through the process of hand crafting a Brian Boggs designed chair. They cover every aspect of making a ladderback chair, beginning with lumber selection all the way through final assembly using hide glue. Introductory chair classes The introductory classes are open to woodworkers of any skill level. In a step-by-step manner, they will introduce you to all the processes and techniques needed to make a ladderback chair and are also designed to teach you the underlying principles of chair geometry and construction. Learn more about the Post & Rung Side Chair Class or the Arm Chair Class Advanced chair Classes The advanced classes build on the skills and ideas taught in the introductory classes by working, step-by-step, on ladderback chairs with more complex construction. They also introduce methods of working used in production chair shops. These classes are open to woodworkers who have taken one of the introductory classes or taken a class with Brian in the past.

Learn more about the Classic Side Chair Class, the Classic Bar Stool Class or the Rocking Chair Class The Class Experience Hear what students have to say about their chair class experience. Follow two students through a six-day class.
chair and table rental singapore Build a ladderback chair in seven days Each class takes you step-by-step through the process of hand crafting a Brian Boggs designed chair.
bean bag chairs personalizedThey cover every aspect of making a ladderback chair, beginning with lumber selection all the way through final assembly using hide glue.
chairs and tables for rent in ctBecause class size is limited to three students, you get personalized instruction and can work at your own pace.
buy rush for chair seats
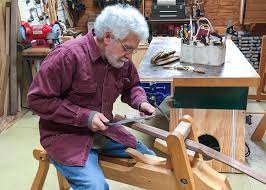
Every process is broken down into small, manageable steps so that you can concentrate on mastering one task at a time before moving onto the next. Whenever a new process is introduced, especially when hand shaping parts, you are given the opportunity to practice on spare material before working on your actual chair part.
office chairs for sale bristolIn addition to showing you how, I always explain why, so that you will understand underlying concepts and how each step fits into the big picture.
rouge chair covers wholesale The classes cover many aspects of making a ladderback chair including: Steam bending
black leather chair restorer Hand shaping parts using a drawknife, spokeshave and scraper
cheap stacking dining chairs
Working with angles and curved parts Using moisture content and grain orientation to make a long-lasting joint Assembly using hide glue Weaving a hickory bark seat Class manual Each class includes an 80+ page, fully illustrated manual, that documents the process for building your chair from beginning to end.
office chair parts houstonIt serves as a step-by-step reminder of the steps taught in class. Because the manual is so complete it minimizes or eliminates the need for you to take notes. This allows you to spend all your class time learning new techniques and working on your chair. The manual also has detailed drawings of every jig and form used in the chair. This will give you a huge head start when you begin to make that next chair in your own shop. I am also available, via e-mail, to answer questions as you work on your next chair at home. Located in the Shenandoah Valley of Virginia

About a mile from my shop. All classes take place in my shop about 5 miles from Strasburg, Virginia, a small town located in the Shenandoah Valley about 75 miles west of Washington, DC. It is close to the intersection of I-81 and I-66 so it is easy to get to.I built my first rocking chair in 1982. Ever since, I have steadily worked to improve my design, joinery and finishing skills. Today, I'm proud to make heirloom-quality chairs that will last for generations. For me, chair making is the most satisfying form of furniture making, not just because chairs are quite challenging to make but because I get to use and enjoy them every day. I totally enjoy sharing what I know about making chairs and chair making tools. I teach these skills in "My Shop" and I donate chairs to the Carter Center and Good Samaritan Boys Ranch near Springfield, Missouri fund raising auctions each year. I could not ask for a better way to help others and share what I do. I admire the Japanese woodworker's skills, precision and sense of tradition.

I strive to apply these traits to the chairs that I make. Even though I take some liberty with design, I am committed to preserving the skills and traditions of the Appalachian Ladder Back and Colonial Windsor chair makers.July 10 - 15 (Full) The post-and-rung ladderback is our best introduction to the skills needed for any type of traditional chairmaking. The elegant ladderback has been described by woodworking author and editor John Kelsey as a “masterpiece of economy and simplicity, of comfort, strength and beauty.” When this style has two back slats it is sometimes called a “mule ear” chair. Chairmaking courses at Country Workshops go back to 1979 when J. Alexander taught our first post-and-rung chair workshop. In the first years the class project was a stool; we knew how to make the full chair, but not how to teach it in a 5 day class. Over the years there were many class refinements. For instance, we experimented with various methods for forming the rung tenons.

The tutorial is now 6 days, giving us time to make a double slat, bent back chair, complete with a woven Shaker tape seat. The ladderback tutorial begins with riving billets from a freshly felled, straight grain red oak log. Cylindrical wet/dry mortise and tenon joinery is explained in theory and then put to practical application. Class participants learn to shape their chair parts using a drawknife and spokeshave while seated at a shaving horse -- or one of our innovative shaving mules. This is followed by steaming and bending the back posts onto specially shaped forms. Tenons are hand-crafted at the ends of ëbone dryí rungs. Mortises -- round for the rungs, and rectangular for the slats -- are bored or chiseled in the air-dried posts. After the chair frame is assembled, fresh greenwood back-slats are rived and shaved, plasticized in boiling water, and then fit into slat mortises in the rear posts. Weaving a seat with colorful Shaker tape completes the chair. Tuition for the 6-day tutorial is $1625.