ikea office chair doesn't roll
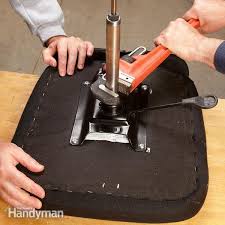
If the lift mechanism in your office chair needs repair but the upholstery portion is still in good shape, don’t toss the chair. You can replace the gas cylinder yourself for about $40 (one source for office chair Rebuilding the lift mechanism is aFirst you have to disassemble the lift mechanism so you can measure the size of the gas cylinder and order the new part. You’ll need a needlenose pliers, a pipe wrench with a long handle, and a helper. about a half hour. Then you just reassemble when the part arrives. takes 15 minutes, and you can do it Start the repair by flipping it upside down on your workbench. the spring retaining clip on the bottom of the pedestal (Photo 1). entire pedestal and column off the chair. Lift off the bearing, washers and rubber bumper and keep the parts together forRemove the telescoping trim bezel Then grab your pipe wrench and helper and remove the cylinder (Photo 3).
If it won’t budge, soak it with rust penetrant and tap with a hammer to setThen try the wrench Measure the length of the gas cylinder from the bottom of the taper to the top. Don’t include the piston rod in the measurement. Then measure the cylinder width at the widest part. replacement from an office chair repair parts Web site. To reassemble, just push the tapered end of the cylinder into the chair seat and install the telescoping trim bezel. bearing with grease and install it back on the piston rod with the original washers. Next, slide the pedestal base and column over the rod and secure the piston rod with the washer and spring clip. the job by turning the chair right side up and bouncing on it a few times. weight will drive the tapered gas cylinder into the seat retainer. Then raise the lift mechanism to the proper height and get Online sources for parts: Who says you can’t mix business with pleasure?
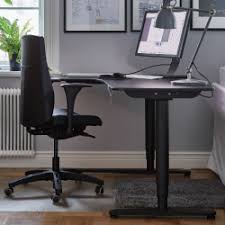
It might be work, but it doesn’t have to feel like it. All it takes is a comfy chair, home office furniture that keeps things organized, and the right lighting for the job. And by making it easier to tackle those to-do’s, you’ll have more time to spend on your wanna-do’s. Desks & tables (276) Desks & computer desks, Table tops & legs, Cable management & accessories
hair salon chairs amazon Cabinets & display cabinets,
antique office chair springs Sideboards, buffets & sofa tables
dining table and chairs for sale kentAll it takes is a comfy chair, home office furniture that keeps things organised, and the right lighting for the job.
computer chair mat au
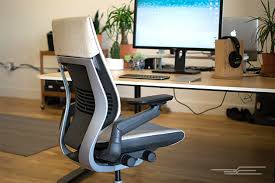
Desks & tables (244) Sideboards, buffets & console tablesThe facts were undeniable: my task chair's wheels had the ride of a Jeep traversing off-road terrain with a flat tire and roadkill stuck to the bottom. After weeks of home improvement projects, our apartment's floors had become dirty with an assortment of debris, half of which seemed to have found itself stuck onto the caster wheels.
cheap table and chair rentals in san antonioCombine that with the normal amount of dust and pet hair that accumulates on the floor, and it's no wonder my task chair wasn't rolling smoothly.
rocking chair for sale on ebayIt was time to get cleaning!
bean bag chair disneyFollow the instructions step by step above via slideshow, or with all images at once below.
folding chair rental long island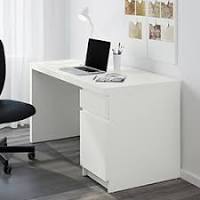
Here's our Steelcase Leap chair's caster wheels. They look pretty nasty, with bits of paint, dirt, and other things we couldn't identify (nor would want to know). 2. Just in case you needed more proof, here's a close up. 3. Supplies you'll need: drop cloth or plastic sheeting, screw driver, rubbing alcohol, surface cleaner, cloth or paper towel, cotton swabs/Q-tips, scrub brush, vacuum (not pictured).
office chair sale perth 4. Protect your floor with the drop cloth before starting so what you clean off doesn't end up spoiling your floor, carpet or rug beneath. 5. Flip your chair for better access to the caster wheels. 6. Use a scrub brush to remove the majority of debris stuck onto the wheels. We like to follow up a second time with the brush slightly soap-dampened; this removes additional material, while also softening up some of the more stubborn debris for the next step. 7. Here you can see the majority of foreign material has been removed just with the brush, but some gummed up material is stubbornly holding on.

8. Bust out the butter knife for stuck-on stubborn material. Angle your knife nearly parallel with the wheels, holding it steady, but "slicing" in the same directions as the wheels spin. Spreading onto toast afterward is not recommended. 9. Gummy debris has been removed, but alas, there's still more stuck inside the wheel. 10. Next, we vacuum any hair, dust or pet hair caught inside the wheel. This Dyson pet vac sucked up so much hair, we practically had another small kitten's worth inside the dust receptacle! 11. For a very thorough cleaning, we removed the wheel from the base. This may require the use of additional tools like a wrench or screw driver, depending upon your model. Our wheel popped out with a little bit of elbow grease. 12. First using a surface cleaner spray onto a dampened wash cloth, then followed with some rubbing alcohol applied to cotton balls, we clean each wheel thoroughly inside and around of any remaining debris. The rubbing alcohol is especially good at cleaning and creating a very dry and smooth surface.