ikea desk chair clear
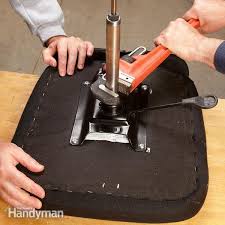
If the lift mechanism in your office chair needs repair but the upholstery portion is still in good shape, don’t toss the chair. You can replace the gas cylinder yourself for about $40 (one source for office chair Rebuilding the lift mechanism is aFirst you have to disassemble the lift mechanism so you can measure the size of the gas cylinder and order the new part. You’ll need a needlenose pliers, a pipe wrench with a long handle, and a helper. about a half hour. Then you just reassemble when the part arrives. takes 15 minutes, and you can do it Start the repair by flipping it upside down on your workbench. the spring retaining clip on the bottom of the pedestal (Photo 1). entire pedestal and column off the chair. Lift off the bearing, washers and rubber bumper and keep the parts together forRemove the telescoping trim bezel Then grab your pipe wrench and helper and remove the cylinder (Photo 3).

If it won’t budge, soak it with rust penetrant and tap with a hammer to setThen try the wrench Measure the length of the gas cylinder from the bottom of the taper to the top. Don’t include the piston rod in the measurement. Then measure the cylinder width at the widest part. replacement from an office chair repair parts Web site. To reassemble, just push the tapered end of the cylinder into the chair seat and install the telescoping trim bezel. bearing with grease and install it back on the piston rod with the original washers. Next, slide the pedestal base and column over the rod and secure the piston rod with the washer and spring clip. the job by turning the chair right side up and bouncing on it a few times. weight will drive the tapered gas cylinder into the seat retainer. Then raise the lift mechanism to the proper height and get Online sources for parts: Ikea Bekant Corner Desk-right, Black-brown, White
0.0 out of 5 stars #2,304 in Office Products > Office Furniture & Accessories > Desks & Workstations > Desks > Office Desks See and discover other items: height adjustable writing deskRevamping a room can help you revamp your attitude and get ready to take on the world! We’re proving it today with our final step of our office redesign project. For those of you who are just tuning in, we’ve been working with IKEA in West Sacramento to update BFFF’s home office.
price of office chair in chennaiWe’ve shared our “before” office pictures and our experience working with IKEA’s very own Home Furnishing Consultant, Jacqueline , and now we’re ready to show you the results!
wooden folding chair weight capacityRedoing a work space can totally change your perspective — once you feel happy and confident about where you are, you feel ready to channel that creativity into your best work yet.
dressing table chair singapore
Here’s what Melissa has to say about the finished office: “Ever since I hit publish on our ‘before’ photos, today could not come soon enough. I would love to personally invite you into my home office to see our official makeover with IKEA. Words cannot describe how over-the-moon happy I am with the outcome. I am confident the look we achieved never would have been possible without the expertise of IKEA’s Home Furnishing Consultant, Jacqueline.
where to buy glider chairs Do you have a room you are dying to make over?
table and chair caddyIn my humble opinion, I think a lot of people (including me) put off planning a stylish room makeover because it seems like such a daunting task.
tub chairs for sale ebayNot to mention you might worry about breaking the bank!
high back chairs perth
Those were the two biggest fears that were in the back of my mind as I constantly pinned photos on Pinterest of my dream office for the past year. Rest assured, our office makeover was done on a less than $1500 budget from IKEA. And I cannot stress how easy and fun Jacqueline made the process! I incorporated a few items from my home into the design too, though the majority of everything you will see in the photos are from IKEA.
fabric tub chairs cheapAs we get into the full swing of spring cleaning, I hope you feel inspired to redo one of your favorite rooms in your house and make it really feel like a home.
best price on eames chair If you feel inspired to redo your own home, be sure to make an appointment with your local IKEA’s Home Furnishing Consultant! Simply call IKEA and ask to speak with their Home Furnishings Department, and you’ll get connected with a passionate design expert.

Once you show them your room’s measurements, they will help you plan exactly how to make the most of your living space. If you are local in Sacramento, California, I highly recommend working with Jacqueline. strong: KARLSTAD tufted loveseat , IKEA PS SANDSKÄR sidetable , TOBIAS clear chair , SKRUVSTA swivel chair , SNILLE chair , MICKE desk , MICKE drawer unit, LAPPLJUNG RUTA rug , ULLKAKTUS cushion, STRAPATS pedal bin, DRÖNA storage box , IKEA STOCKHOLM pendant lamp, KALLAX shelving unit. *This post is in partnership with IKEA . your go-to guide to creative living! Photography: Milou & OlinI've been holding onto the shame of this failed DIY attempt for quite some time now. But let's face it, everyone makes mistakes and I think this is something the world needs to hear about. You can learn from my failures! I love doing How-To's on the blog but today I have something different for you: A How-Not-To! My hope is that you'll

read this post, possibly laugh at me, and then go out into the world armed with your new found knowledge and do it right. It all started here with my trusty Lack coffee table from Ikea. We bought it for $49 for our first apartment and it had been through many years of abuse and served double duty as our dining room table. We're classy like that. poor guy was all scratched up and really looked like he had seen better days. got the brilliant idea in my head that I was going to paint good old Lacky (from here on out I'll refer to the table as Lacky) and give him new life! A BRAND NEW TABLE! I also got it in my head that he needed to be fuscia. hesitantly brought this up to my husband one night when we were sitting cross legged eating dinner with Lacky, thinking there was no way he'd allow me to paint a piece of our furniture bright pink. Surprisingly, he said he didn't care at all what color Lacky was but he made sure to point out that he thought it was a bad idea in general

to paint Ikea furniture. Whatever man, what do you know? I began by thoroughly reading skimming a bunch of tutorials on painting Ikea furniture, spent a couple of minutes scrolling through Ikea Hackers and considered myself an expert on theMost of the tutorials said it was very important to give the surface a good sand and use a primer that was meant for slippery surfaces. Some people said that it's best to paint a piece of furniture that doesn't get a lot of wear, because the paint job is prone to chipping. I assumed they did it wrong and my table would be While at the hardware store, I found a primer that said on the label "Sticks to all surfaces without sanding" and the extremely knowledgeable hardware store guy teen assured me it wouldWell aren't I smart? This is going to save me so much time! won't even have to sand Lacky! Next came the paint. A second employee took it upon himself to help me with this. He was a large man and his uniform shirt was unbuttoned almost half-way

with a thick mass of chest hair right at my eye level. I could focus on. I showed the paint chip to Burt Reynolds and he told me I was looking at the wrong paint. I needed one with a clear base and they would have to tint my primer too. a can off the shelf for me. He also warned me it would be a tricky color to use and I would need to do several coats, maybe even 3, and let each coat dry at least 24 hours before the next one. Then he regaled me with a fascinating story about the time an episode of Restaurant Makeover was filmed down the street and they bought their paint in this very store. They wanted to do a red accent wall and he told them about the 24 hour rule but they didn't listen to him and THE WHOLE RESTAURANT WAS RUINED! really remember how the story ended, I was too distracted by the chest hair. did get drilled into my head that I needed to wait 24 hours between coats. told him about Lacky, get this, he said it was a bad idea to paint him!

Just give me my paint and shut up.I went back to the store the next day and saw that BurtI asked him to please exchange my exterior paint for some interior paint because I didn't want to get light-headed and vomit while I was painting Lacky thank you very much. I can only assume that his chest hair had now grown into his brain because he tried to tell me that there was NO DIFFERENCE between interior and exterior paint and I should just use what he picked out for me. Being the DIY expert that I am I went on a rant about how there's a chemical in exterior paint, no I don't remember the name of it, but it's bad and it does bad things to people when used indoors like causes diziness, nausea, and probably evenSo if he didn't want me to die he would get me a new can of paint please andOh, and you better believe I tweeted about it. I'm gonna paint my Ikea coffee table! The hardware store guys think it's a bad idea and tried to talk me out of it...

I'll prove them wrong! — Sara Funduk (@mrhandsomeface) October 11, 2011 By this time I had already started with my primer. It was tinted grey to deal with my "tricky" color choice and really did feel super sticky. to be safe, I let it dry 24 hours and then put a second coat of primer on. coat dry another 24 hours and decided it was safe to start with the fun part. I really loved this color. But apparently I didn't love it enough to spend a couple bucks on a decent roller! This turned out to be a very bad decision because it left a ton of fuzzy bitties behind as I painted and the coverage was really uneven. picked out as many fuzzies as I could and decided it would look better after a second The next four days were all about Lacky. Set up Lacky in the den, open all the windows, do a coat while trying to keep the cats from walking in paint, drag Lacky (carefully) into the bedroom so the cats wouldn't rub up against him, wait all day, drag Lacky back out to the den so we could sleep,

cover him with a sheet and hide him under a desk so the cats wouldn't claw him up, wake up the next day and repeat. I did this for FOUR DAYS! Did I mention the cats? Throughout this whole process, they would not leave Lacky alone. I have never seen them so focused on anything in my life. It was actually kinda creepy. Lacky actually ended up looking great. Sure, the paint was a little bumpy in some spots because of the bits the roller left behind, but it added character! you didn't get too close, he looked fantastic and I was very pleased. Here's the part where I started to realize this wasn't working out. After I was done the last coat of paint, I let it cure for about a week. Lots of stuff I read online said you would need to wait for the paint to actually harden before it would be durable enough to use as a table again. waited the week and I'm not a very patient person so it was very hard! how I said Lacky was our coffee table/dining room table?

That meant we were eating all our meals at a big plastic bin with a whiteboard on top. that was not cool. I probably should have been more patient and waited for the paint to fully cure, but I really believe I would have been waiting forever! Over the next 2 months or so, the paint never cured. If you set anything down on the table, it would leave a noticable mark right away and everything stuck to it. One time I put a magazine down and left it there for a couple days. When I picked it up again, the back cover stayed glued to the table and ripped right off! I ended up leaving poor Lacky behind my apartment building and buying a brand new coffee table like the fraud I am. By the end the paint was chipping like crazy, the table top was covered in dents and marks, and dust and lint was completely imbedded into the paint. Here's why you hopefully read this whole post, but mostly like just scrolled to the bottom for, my list of mistakes.