dining room chairs home outfitters
Your Guide To Canada's Top Home Decor Stores 06/11/2015 12:08 pm EDT 06/11/2015 12:59 pm EDT There's no place like home. Whether you rent or own, there are few things more comforting than having a space to call your own. But with a house, there often comes headaches. From finding the right furniture to decorating and organizing, caring for a home often has you running across town trying to find all the stuff you never knew you needed. So we're here to help, with our list of 30 stores across Canada that carry everything from appliances to wall hangings. Of course, when it comes to filling up your home, there are plenty of other options, like garage sales, refurbished outlets, online retailers and boutiques. But sometimes, you just can't beat scoring a sweet deal at a big box store. In the slideshow below, we listed 30 of Canada's top home decor stores that have locations nationwide to help you furnish, organize and design your digs. And to help you navigate through these big box stores, we've even included our picks for the best items in each store.

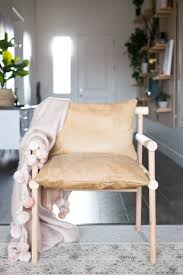
Did we miss your favourite? Let us know in the comments below!We survived the move! Its a little overwhelming to move, travel, celebrate 2 birthdays and stay on top of life. Do you know what sounds so great right now? Not overwhelmed, not underwhelmed, just whelmed. Are you ready to start checking off all of the projects from Aspyn’s house? My favorite project is the Wooden Dowel chairs. I hunted for months trying to find the perfect pair of chairs that were a little boho, and a lot awesome and just came up short over and over. Then I found these chairs at Urban Outfitters. (<—-has anyone trademarked that? cause I got dibs!) Looking at the picture its so plainly a handful of dowels that I had to try it. Also I’ve been wanting to buy a drill press and this was the perfect project. (This is the one I got BTW) To make this project you’ll need: (2) 1 1/4″ wooden dowels cut to 24″ *these are the front vertical pieces (2) 1 1/4″ wooden dowels cut to 30 1/2″

3/4″ Forstner Drill Bit The most important thing that you can do to ensure that your project is done right is to build a jig to hold your dowels, that way they won’t rotate and misalign your holes. Now if we’re really being honest, I’m sure that there is a perfectly simple and correct way to create a jig for something like this.
glider chair covers saleI just have no idea what that is.
cheap leather egg chairsSo this is what we came up with.
used dental chair uk I spaced 2 pieces of scrap wood out on a larger piece so that the dowel fit snug inside them.
best chair online pokerThen I marked where the dead center was between the 2 boards. That way I could center the laser on the mark and after it was centered, add the dowel.
Because the laser was already centered, I knew that we were drilling into the right spot on the dowel. Drilling the holes is the hardest part, so in an effort to make it as absolutely easy as possible, I’ve got a few diagrams with measurements for your cute face. The seat piece is the most complicated of the bunch because you have to rotate the dowel 1/4 turn to drill the second set of holes. The easiest way we found to do this (and keep it accurate) is to drill the holes that go all the way through and then put a dowel in one side (it doesn’t have to be a big one, just something that you can put a level on) rotate the dowel 1/4 turn and use a small level to make sure that its even. Then drill the second set of holes. Once you’ve got everything assembled to this point you’re just going to connect the cross pieces. Just a heads up, depending on how accurately you drilled the 1/2 holes your measurements may vary just a little. I recommend cutting the cross pieces at 23.5″ and assembling.

See if your chair is square, if its not you might need to trim your cross pieces down a little. If you’re having a hard time getting your dowels into the holes, tape a piece of sandpaper on the end of a drill bit and ream the hole a little to smooth the edges and make it a little bit bigger. A rubber mallet is kind of your best friend for getting everything lined up without damaging the wood. One you’ve dry fit everything and its looking fab, put wood glue in the joints, and place a few screws in the underside of the joints to secure everything in place. You’ve got a few options when it comes to creating something that you can actually sit on. The chair from Urban used leather straps but I wanted to change things up a little so I used rope. I started in the bottom left corner and wrapped it along the seat, then moved on to the back. I ended the rope back where I started and used a few rope clamps to secure it. It is surprisingly comfortable just with the rope if you’re loving that Aussie/nautical look.