dining room chair repair upholstery
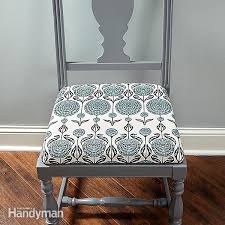
Step 1: Chairs are not all created—or upholstered—equally Here we’ll show you how to reupholster a chair with a “drop-in” or “screw-on” seat—a style shared by many benchesSeat bases can be constructed from a variety of materials: solid wood, plywood, pegboard and others. are normally screwed on but can also be glued on or dropped in. can be foam, cotton or other natural Which stapler works best? All the staplers shown will do the trick. The question is: How hard do you want to work—and squeeze—to “do the trick”? Your stapler buying decision may also hinge on a few other factors, including how often you’ll use it, what else you might use it for—and whether you need a good excuse to buy an air compressor. It will give your hand a workout, and you may have to occasionally use a hammer to drive the staples all the way in, but you can still get good results. hold the nose of the stapler firmly against
the seat base when you pull the trigger. Cost: $15 to $30 We used one for our project and itYou still need to firmly press the nose against the fabric and plywood to get a well-seated staple—but it’s way easier on the hand. As a bonus, some models also shoot 3/4-in. and shorter brad nails. Cost: $25 to $75 If you’re going to be stapling for hours on end, invest in a pneumatic stapler. These drive the staples flush with the pull of a finger and allow you to be extremely accurate in the placement ofSome tools also drive brad nails up to 1-1/4 in. Cost: $40 to $150 (plus air compressor) Step 2: Round up your materials When you shop, buy “upholstery grade” fabric for its strength and stain resistance. Fabric prices vary wildly; might find something for $5 in the bargain bin or spend 10 times as much. bought our fabric, foam and batting at aFor the dust cover, we used

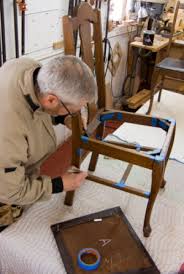
landscape fabric from a home center. Step 3: Remove the old and get ready for the new If you’re re-covering more than one chair, number each chair and seat; way, the screw holes will line up properly when you reinstall the seats. are special tools just for yanking upholstery staples or tacks, but you can get by with basic hand tools (Photo 1). dull side cutters are perfect. staples well but don’t cut them off. Remove the padding and inspect theIf the wood base seems solid, reuseIf it’s cracked, use it as a template to make a new one (Photo 2). sander to taper the edges to match the profile of the old one. Plop the seat on top of the foam and outline it with aUse a serrated bread knife (Photo 3) to cut just inside the line. Step 4: Install the new fabric Place a section of batting—4 in. wider in all directions than the size of your chair seat—on a flat work surface, then set your foam and seat on top.
more time, then flip the seat upsideStarting at the front middle staple and working toward the corners, use the palm of your hand to lightly stretch the material, then drive a staple every 2 in. (Photo 6). staples within an inch of the edge, and secure the batting and fabric at theUse your entire hand, not just fingertips, to tighten the material. This way you’ll avoid little dips and puckers in the pattern.
round swivel chair used Repeatedly flip the seat over to check the pattern for
bedroom chairs for sale melbourneit’s easier to keep flipping and checking
ikea high chair cushion than to go back and pull staples.
outdoor chair pads gold coast
Our expert flipped the seat over and checked the pattern a dozen times whileStop stapling 2 in. from each corner. Secure the back edge in the same way, stretching the material lightly as you work. Then complete the sides, again repeatedly checking the pattern. Step 5: Corners are the key You can make simple, single-fold “hospital corners” if the edges of your seat are concealed by a frame. most cases, the front corners will be exposed and will look better with a “butterfly corner.” Remove excess batting and material from the corners (Photo 7) then flip the seat right side up and experiment with a few corner tucks. Fold the center inward, then overlap each side onto that fold (Photo 8). corner looks symmetrical and tight, flip the seat over and staple the folds in place. When the corners are done, flip the seat over and cut off the excess material. Staple on a dust cover (Photo 9).Lawn Chairs Old Chairs Outdoor Chairs Adirondack Chairs Outdoor Furniture Chair Repair Furniture Repair Furniture Plans Patio Ideas Forward how to repair aluminum patio chairs... we had some oldies handed down to us so this is going to be my project to finish before the nice weather hits!!