dining chair covers at ikea
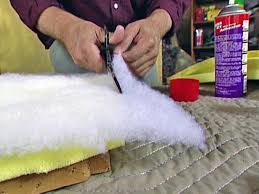
Gather upholstery tools and materials. Take fabric off chair by pulling out staples with a staple puller (upholsterer's staple remover -- Image 1). Be sure to remove all staples and tacks. Never place new fabric over the old material. If you do, when you go to clean the new fabric, the stains from the old cover could come through. Take old webbing (Image 2) and padding off the chair. Put on new polypropylene webbing in a basket-weave pattern by doing the following: Start in the middle, fold over the end and staple in place (Image 1). Use a bar clamp to hold the webbing down. Gently rock the webbing stretcher (Image 2) until the webbing is tight. Staple the end into place. Cut the webbing, leaving an extra inch to fold over and staple down. Repeat the process for the other strips from front to back. To add horizontal webbing, repeat above steps and weave the strapping under and over, alternate weave (Image 3) in remaining strips. Lay pad onto oversized 1" high foam (available at most fabric stores).

Trace outline of pad on foam and leave 1/4" all way around. Put foam on top of webbing with spray adhesive. Lay 1/2" thick bonded dacron on top of foam. Trim dacron 1/4" bigger than pad. The dacron will give the seat a nice crown effect. For four chairs, it will take approximately one yard of fabric and 1-1/2 yards of fabric for six chairs. Be sure to leave at least an excess of three inches of fabric all the way around the chair seat. To attach fabric, first find the center front width of the pad and back, and mark. Do the same on the back and make a center mark. Find the center of the fabric. Fold fabric along center line and cut small notch (Image 1) for both front and back. Starting from the back, fold the fabric over and line up the notch with the center mark. When fabric is straight, start attaching staples, leaving the corners alone. Repeat above step to attach the front and then the sides. Use your spare non-stapling hand to smooth and straighten the fabric as you're stapling.

Sign Up for More We love to DIY. You love to DIY. See the latest DIY projects, catch up on trends and meet more cool people who love to create.
folding metal chairs pair Make It. Fix It. Learn It. Find It.
used mahogany dining table and chairs Get quick inspiration from Made + Remade each week.
baby bouncy chair safety The Essential Steps to Landscape Design
baby bouncy chair safetyTry These Plants and Groundcovers 10 Things You Must Know About Landscaping Lush Landscaping Creates Major Curb Appeal Making A Checkerboard Patio Garden How to Design a Great Yard with Landscape Plants How to Landscape Around a Back Deck

Groundcovers and Plants to Use As Lawn Alternatives How to Landscape a Shady Yard How to Shape a Lawn or Garden Space Add Interest to Your Lawn With Ornamental GrassesNot to be confused with tie dyeing. What am I, a hippie? You guys know me better than that.So remember a little while ago when I talked about buying new slipcovers for our couch? You really need to start thinking about taking some ginkgo biloba. Well, after calculating the shipping, I decided to try something else first. Something that might be considered a little (or straight-up) crazy. I decided to dye some. Because the white slipcovers at Ikea are $40. [Update – not anymore I guess.] How hard can it be to dye them. When Ryan mentioned it in passing to the girl at Ikea when he bought the slipcovers, she said (very snottily) “Good luck with that…” The problem – every single tutorial that dyed something this large was performed in a washing machine. Because the world is one big kick in the balls, I don’t have a washing machine.

Well, we do have two communal washing machines in the , but they are the ghettoist of the ghetto. There is no way to determine where you are in the washing cycle. You basically put in your $1M worth of quarters (seriously – $2.25 to wash and dry a load of laundry???) and hit start. Okay, you can choose the water temperature, but that’s it. So trying to attempt dyeing in there was wasn’t an option because everything is timed.I know lots of people have dyed things in a bathtub or a bucket or something similar, but no one was brave (stupid) enough to consider dying two giant slipcovers. Well, until Ryan and I came around. Let me start out by saying that if you do attempt this, visit . (I miss you so much Lost!) Why didn’t I just grab some bottles of RIT dye from Jo-Anns? Because I thought that I should buy some big girl dye instead of the stuff Grateful Dead groupies use to make their ridiculous costumes. I wasn’t monkeying around! And I’m really glad because Dharma Trading Co. has step-by-step instructions on how to dye and the additional products needed to make the end result as perfect as possible.

Also, give yourself a good window of time. We mistakenly thought that we’d be done (well, minus the drying time) in 4 hours. We also couldn’t use our shower until the process was over which also set us back. And we were supposed to be somewhere at 12:30. There is also quite a bit of calculating that needs to be done when you are going to attempt something like this. You need to figure out the weight of the fabric, the amounts of water, salt, dye, ash, and other “ingredients.” Initially we thought that we were going to have to do the job in two loads, but after finishing all the calculations, we decided to do them all at once. We hoped that would minimize the problem of trying to match the dye proportions perfectly. Here’s how it went down: First, we washed the slipcovers. This we COULD do in the washing machine, so we did. Second, because I’m BRILLIANT, I decided to save the bathtub by buying a $2 shower curtain and duct taped it inside the tub.

I mean, dye was going to be sitting in there for over an hour. Getting it out of the porcelain is a potential nightmare. (Side note – don’t you love my little decals! They remind of the ones we had in our bathtub growing up.) Next, we filled the tub (we determined how much water we needed beforehand obviously), made a slush out of the dye, and poured it into the water-filled tub. Then we added the wet slipcover. And the stirring began… At first I was all “should I just use a wooden spoon?” I can laugh now because that is a ridiculous suggestion. The fabric is HEAVY and a wooden spoon would have snapped in half at about the 10 second mark. Ryan dug around in a little room the Queen AnnE uses as a bike room and found a discarded oar. Oh Queen AnnE…you’re such an enigma. In light of that, if you are going to attempt this, get something sturdy like a 2×4 (or an oar) to mix it. After about 15 minutes, we added the ash which we had already mixed with some water.

We pushed all the fabric off to the side so that we could stir the ash in without letting it directly touch the fabric (seriously – don’t forget to read the directions at Dharma Trading Co.) To make this easier, I decided to put gloves on and just hold all the fabric over to the side with my hands. I guess the gloves weren’t long enough. After a day, it’s faded a bit, but I still look a little Oompa Loompa-ish in and around my hands. After we added the ash, we stirred for another 45 minutes. Oh, and let me say that we didn’t just stir it around with the oar. Every 10 minutes or so, I would pull out each piece of the slipcover to untangle it and then set it back. I was very worried that it would get so bunched up that the fabric wouldn’t get covered evenly. And there was a LOT of fabric in the tub. It didn’t help that there were those sections of the slipcover that were made of something other than cotton and therefore didn’t color. They didn’t need to be dyed as they are on the inside of the couch, but it still made me nervous.
This is where, in my opinion, we made a mistake. Because we were unfamiliar with this kind of dye, we thought we should keep it in the dye bath even after we reached our desired color. We were afraid that a lot of the dye would wash out and then it would be much lighter than what we wanted. What we didn’t count on is the fact that this dye is awesome. (I swear I’m not getting paid to write this). Ryan thinks it did a tiny bit, but I don’t think it rinsed out at all. That brings us to the rinsing. Ryan rinsed this thing to death. He rinsed it several times in the tub. He even filled the tub up with water, squeezed each piece of the slipcovers out and then drained the tub. Then we ran it through the washing machine three times. While the label on the slipcover says you can machine wash it, it says not to dry it. I was bummed because we have no place to air dry something of this magnitude. We just draped the pieces all over the place. Here’s the before and after:

I’m going to go out on a limb here and say that you might be hungry for some Cheetos. I’m not crazy about it. But isn’t the before picture a big snoozefest? Could you even see the couch? It blends in with the carpet and walls so well. And the dye job itself is fabulous. There are no streaks – everything is totally even. That being said, I think we’re going to give it another go in a different color. And even though I’m not over the moon with the color (which Ryan loves by the way), I’m totally obsessed with this dye. I mean, it was actually a lot simpler than I thought it was going to be. Especially since the end result was so great (minus the crazy brightness). So, if you are a sad soul like me without a washing machine, don’t let that stop you from dyeing large things. It may seem daunting, but it’s totally do-able. *UPDATE* – Since this has now gone “live” on Ikea Hacker, I just want to state that I have grown to love my little Tangerine Dream and wouldn’t dream of getting rid of her.