cheap wrought iron patio chairs

Sharing at these link-ups. Lounges, Daybeds & Chairs Patio Sets See all Lounges, Daybeds & Chairs See all Benches & Gliders See all More Categories in Patio Furniture Patio SetsYour online account has been created. The Briarwood collection embodies classic wrought iron patio furniture design & gives you a myriad of options to create a comfortable outdoor dining & living area that you & your family will love to use. Wrought iron metal arm rests emphasize the functional character of the Carlo outdoor furniture collection. Light and filigree, it features an ergonomic design that doesn't compromise comfort. Wrought with old world craftsmanship, this outdoor furniture embodies the graceful elegance of wrought iron. With its artisan bends, Classico brings comfort & tranquility outdoors. From Sunvilla, the Monaco collection features commercial grade wrought iron with two different powder coat finishes, graphite and black. The Monterra collection features unique details such as hammered rivets at key points & embossed flat bars that envelope the cushioning of the chair, creating beautiful & comfortable deep seating.

Named for the Spanish Cathedral in the heart of the Old Havana district in Cuba, San Cristobal wrought iron furniture captures the romance & detail of the Spanish Baroque style in a beautiful design.
hay about a chair material The Sheffield collection from Woodard is ruggedness at its most elegant.
hanging egg chair ausThe scrolling arms and latticed woven seat and back frame provide an ageless and classic look that will endure for years.
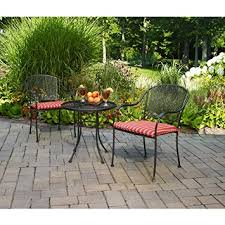
best mesh office chair 2013Add elegance and durability to your outdoor entertainment areas with wrought iron furniture.
small accent chair targetOur KETTLER wrought iron chairs and tables are perfect for both decorative and everyday use.
buy office chair leeds
For the full effect, choose a wrought iron patio set, or use a small wrought iron table as an accent for your patio or deck throughout the year.
childrens high chair booster KETTLER utilizes an exclusive Electrotherm® coating technology on all of our wrought iron furniture.
chair mats for hard surfacesThis finish is three times thicker than a conventional powder coat.
bean bag chair 6 footThe Electrotherm® coating creates an extremely smooth finish in combination with smooth weld points and resists scratching, peeling, fading and chipping.
toddler lounge chair lands endAnother advantage is that your wrought iron furniture will remain approximately 20% cooler after long sun exposure than conventional paint finishes.

span 2 3 4 5 14 >> Solid one piece top construction is warp proof with chip resistant edges Unique thermal treated coating provides added brilliance and non-staining characteristics UV inhibitors are permeated throughout the top to prevent fading and discoloring Robust all aluminum frame with adjustable foot levelers Relatively light weight yet extremely rigid Totally weather proof with self-cleaning characteristics Universal design with high quality workmanship Proprietary Electrotherm coating resists scratching, chipping and fading Contoured seat and back for maximum comfort Foldable for easy storage Protective foot caps prevent marring Proprietary Electrotherm® coating resists scratching, chipping and fading Multi-positional backrest provides many seating options Transport wheels for easy moving Available in GRAY frame finishStep 1: Get Ready to Paint Pick a warm, dry day to paint your wrought iron pieces.
Don’t start painting if surfaces are wet, when the humidity is more than 80 percent, if the temperature is less than 50 degrees or if the piece you're painting is directly in the sun. If you’re painting movable wrought iron pieces, choose an open area outdoors, covered with drop cloths or tarps for your workspace — you don’t want overspray or splatters and drips to ruin surfaces that you don’t want painted. For fences or railings, make sure that the ground and surrounding surfaces are protected by drop cloths and painter’s tape so they aren't marred by the paint if the overspray is caught by the wind or if the paint drips. Set up a large piece of cardboard, lightweight wood, or hang a drop cloth or sheet as a shield against overspray that might blow onto other objects. Place the "shield" on the side opposite of the one that you're painting. Step 2: Remove Old Finish and Rust Clean the metal with a vinegar/water solution (50/50) or use water with a mild detergent and a scrub brush or rag to remove dirt and grime.

Use a bleach/water solution or a commercial mold remover to remove any mold or mildew. You need to remove both the old paint and rust for new coats of paint to adhere properly. Keep in mind that you don’t have to remove every bit of the old paint. The surface just needs to be free of loose flakes of paint and other debris. Sanding and scraping the surface also “raises” the surface a bit for better paint adhesion. You can remove both rust and paint using a stiff wire brush or an electric drill equipped with a sanding pad and abrasive discs. Emery cloths (cloth-backed abrasive sheets) can be used when there is minimal rust. Emery cloths work well because they are sturdier and easier to use than sandpaper on items such as railings or fences because of their flexibility. Paint scrapers come in handy as well. Remove sanding dust as you go. Wear a tight-fitting dust mask, safety goggles, and appropriate clothing that covers your skin while you sand and scrape away paint.

Use Naval Jelly rust dissolver to ease removal of any remnants of rust on the metal. When applying, always follow the manufacturer's instructions on the label. After it has dried, wipe the surface down with a rag to remove any leftover dust or debris. You should see bare metal where the rust has been removed. Step 3: Apply Primer Spray wrought iron with a primer made specifically for metals, such as True Value X-O Rust rust-inhibiting primer. Aerosol primer and paint often provide the best, smoothest coverage results on metal, however; it may be necessary in some areas to apply metal primer with a brush. For best results, apply two coats. When spraying, "back-brush" (painting over just-applied paint before it begins to dry) to work the paint into the surface so it will adhere better and smooth out any drips. Allow the primer to dry thoroughly for at least 24 hours. Primer does not always feel wet or tacky before it is completely dry. After using aerosol primer (or paint), tip the can upside down and depress the nozzle for a few seconds until paint stops coming out.