chaise lounge chair diy
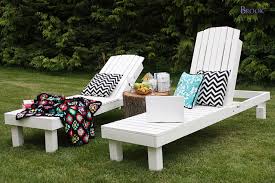
5 – 2x4 @ 8 feet long 8 – 1x3 @ 8 feet long 2 – ¼” bolts 4” long with nuts and 6 washers 2” exterior screws or nails and glue to nail slats down with Please read through the entire plan and all comments before beginning this project. It is also advisable to review the Getting Started Section. Take all necessary precautions to build safely and smartly. Work on a clean level surface, free of imperfections or debris. Always use straight boards. Check for square after each step. Always predrill holes before attaching with screws. Use glue with finish nails for a stronger hold. Wipe excess glue off bare wood for stained projects, as dried glue will not take stain. Be safe, have fun, and ask for help if you need it. 2 – 2x4 @ 85” 2 – 2x4 @ 21” 16 – 1x3 @ 24” 6 – 2x4 @ 14” 2 – 2x4 @ 7” 2 – 2x4 @ 32” 3 – 2x4 @ 17 ½” 7 – 1x3 @ 37 ½” 1 – 2x4 @ 24” (stop block) Build your frames first.

You can use 1 1/2" PHs and 2 1/2" PH screws OR 3" countersunk screws. I highly recommend the PHs because it will hide your screws holes, making it easier to paint the pieces, and then attach later through the PHs. Next add your slats. You can also attach slats from underneath with PHs if desired. Attach legs, and then to front, attach second row of legs. Use 2 1/2" screws and glue here. These legs are just long enough to provide you a spot to put the stop block when chaise is fully reclined. Now build your back - recommending 1 1/2" PHs and 2 1/2" PH screws again here. Add the back slats. Now we attach back to chaise with the pivot bolt .... Brook is also sharing with us her step by step finishing tutorial here to get this amazing finish! And the missing diagram for the stop block - thanks Brook for the heads up and Mark. Outdoor Outdoor Intermediate Cottage Style Furniture Plans, Farmhouse Style Furniture Plans6 – 1×2 at 8’ 9 – 1×3 at 8’

2 – 1×6 at 10’ 1 – 1×8 at 6’ – optional for wheels 1 – 2×2 at 8’ 1 – 2×4 at 6’ 1 – 3/4” Dowel at 3’ 1-1/4″ Pocket Hole Screws 2-1/2″ Pocket Hole Screws 2 – 8” wheels optional Axle Rod – will need to be cut to size at 29″ 4 small hinges – butt hinges will work perfectly Pocket Hole Plugs – Paint Grade, Pine, Oak – optional 3/4″ Edge Banding – optional 2 – 1×6 at 83 3/4″ Frame 2 – 1×6 at 26” Frame 4 – 1×2 at 44 1/2” Interior Frame 3 – 1×2 at 26” Interior Frame 2 – 1×2 at 28 1/2” Vertical Back Rest Supports 1 – 1×2 at 25 1/2” Back Rest Support (Lower) 4 – 1×2 at 2 1/2” Back Rest Stops 2 – 1×2 at 2” Back Rest Stop 2 – 1×2 at 4 1/2” Back Rest Stop 2 – 1×2 at 14 1/2” Lower Back Rest Bar 2 – 1×2 at 24 1/2” Leg Stretchers 30 – 1×3 at 20 1/2” Seat Slats (Lower 17 and Back Rest Portion 13)

2 – 1×3 at 46 3/4” Seat Outside Runner Boards 2 – 1×3 at 35 1/2” Back Rest Outside Runner Boards 1 – 2×2 at 26” Back Rest Stand 1 – 2×2 at 11” Back Rest Stand 2 – 2×2 at 21 1/4” Back Rest Stand 2 – 2×4 at 9” Front Legs 2 – 2×4 at 7” Back Legs This project has some options for the wheel section for you to decide on. You can opt to skip wheels altogether in which case you will make all 4 legs the same length and skip the last 2 steps in this post.
folding foam chair bed childYou can also opt to either purchase wheels, or create your own wheels (I would recommend giving this a try) in which choice you will simply carve circular shapes from 3/4” stock and drill a hole halfway into the wheels in the center to hold the axel rod (dowel).
dining room chairs bargain
Consider using a specie of wood suitable for outdoor use such as cedar, redwood, teak, etc., and be sure you choose galvanized or coated hardware to avoid rust. Be sure you finishing materials and products are suitable for outdoor use as well. Read through the entire set of instructions and all comments before beginning this project. If you print out or save plans, be sure to check in on my site to be sure you have the most up to date set of plans, as I occasionally update things for ease of building or buying.
used wheelchair van for sale by owner floridaIf you are new to building, read through the GETTING STARTED section and other articles found under the BUILD tab in the menu on my site, it has valuable information about how to get started, tools and techniques.
buy dining room chair slipcovers
If you are unfamiliar with the finishing process, visit my Finishing school for some tips and tricks for painting like a pro and for special finishing practices. Use glue to secure your joints and Consider Painting or Staining individual sections prior to assembling. This makes the paint application virtually flawless. Coat with a spray on Poly or Wipe on Poly to protect your finish and your piece and it will last for ages. Adhere to all safety standards and guidelines, and be sure you follow safety protocol throughout your build.
bean bag chairs londonIf you are unsure about whether you are building safely, run a quick online search for the tool or technique you are using, or contact me via email or post to the forum before you move ahead.
best cheap portable massage chairMy contact info can be found on the main page of my site.

Build the Frame: Use your Kreg Jigs® set for 3/4” stock and your 1 1/4” pocket hole screws and glue. Add the Interior Frame: Build using your Kreg Jigs® set for 3/4” stock and your 1 1/4” pocket hole screws and glue, then fasten to the Frame using 1 1/4” Wood Screws and glue. Place the Interior Frame 3/4” from the top edge of the Frame to allow for the Seat Slats to rest flush in the next step. Construct the Lower Seat: Fasten the Slats in place using your Kreg Jigs®set for 3/4” stock and your 1 1/4” pocket hole screws and glue to fasten the slats to the Outside Seat Boards. Leave 1/4” Overhang at one end of the Seat (the end that will sit in the center of the lounger and connect to the back rest). Construct the Back Rest: Use your Kreg Jigs®set for 3/4” stock and your 1 1/4” pocket hole screws and glue to construct the back rest portion of the seat, then attach to the Lower Seat using standard butt hinges. Add the Back Rest Supports: Use your Kreg Jigs®set for 3/4” stock and your 1 1/4” pocket hole screws and glue to attach your supports to the back rest.
They will attach in a vertical position to the back rest and should be spaced 11 1/4” apart (yellow bars) to adequately allow for the back rest stand in the next step. The lower support (blue), will simply attach in the center of the lowest board to provide extra support for the back rest. Add the Back Rest Stops: Use your 1 1/4” Wood Screws and glue to fasten the 1×2 sections in place. You will place the stops 3/4” from the top edge just as you did with the interior frame, and each small section should be place about 2 1/2” from the next small section, but you are free to place these as you see fit for allowing the back rest to sit at comfortable positions in recline. Just be sure to allow for adequate space between the last stop (the 4 1/2” section in yellow) and the seat itself so that when the back rest is in the completely flat position there is plenty of room for the back rest stand to sit. The lower stop bar, will sit just below the actual back rest stops to act as a stop for the stops, so to speak, and will sit under the top bar of the interior frame and rest against the top portion of the frame itself.

Create the Legs and Attach them: To carve the shape for the legs, begin with a 2×4 and carve the curve from the top edge down to the location 2” in from the outside. The front and back legs will be different heights to allow for the wheels in the next steps. If you prefer to skip the wheels, you can make all 4 legs the same length and stop after this step! This is up to you. Add the Axle: This is really simple and you will use a drill bit to create a hole in the back legs at the distance that equals the same distance as the bottom of your wheel to the axle hole (don’t forget the back wheels sit higher and don’t rest fully on the ground – factor this in!). The hole needs to be just slightly bigger in diameter than the axle you are using so a 3/4” bit should be perfect. You will need to cut your axle rod down to size. Do not glue the rod, simply insert and move the the next step. Add the Wheels: Slide the wheels onto the outside of the axel. Measure the length your rubber stoppers will sit on your rod by placing them on the ends of your rod and marking off at the bottom edge.