chair back covers for kindergarten

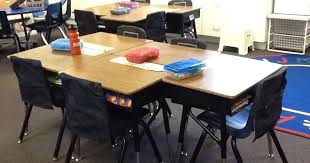
Classroom Setup Classroom Design Classroom Organization Kindergarten Classroom Classroom Labels Classroom Environment Autism Classroom Behavior Management Classroom Management Forward My wonderful aid, Nancy & I had this idea for our Kinder classroom chairs...we originally started trying to make the chair covers (another Pinterest idea) but it ended up costing about 6 dollars/chair and a LOT of time. We did some brainstorming...knowing about the positive experiences students have had sitting on exercise balls in class (but knowing my type A personality can't handle 26 balls rolling around the classroom), this idea created a way for the ball to be stationary, but the… Ships with any qualifying order over $25. Used & new (107) from $7.69 This item is available because of the Add-on program The Add-on program allows Amazon to offer thousands of low-priced items that would be cost-prohibitive to ship on their own. These items ship with qualifying orders over $25. Carson Dellosa Chairback Buddy Pocket Chart (158035)

Add-on Item FREE Shipping on orders over . X-ACTO SchoolPro Classroom Electric Pencil Sharpener, Heavy Duty, Blue/Grey FREE Shipping. Buy Used and Save: Buy a Used "Carson Dellosa Chairback Buddy Pocket Chart (158035)" and save 61% off the $12.95 list price. Buy with confidence as the condition of this item and its timely delivery are guaranteed under the "Amazon A-to-z Guarantee". See all Used offers. The Chairback Buddy Pocket Chart is the ideal solution for your classroom storage needs and the easiest way to keep supplies organized and within reach!.
buy recliner armchairIt slips over the back of most preschool and early elementary chairs, measures approx.
cheap floral armchairs 22.5 x 12 x 0.2 inches
chair seat pads amazon
4.3 out of 5 stars #30,853 in Office Products (See top 100) #53 in Office Products > Educational Supplies > Pocket Charts #1,278 in Office Products > Educational Supplies > Teaching Materials #36,547 in Office Products > Office Supplies 10.4 ounces (View shipping rates and policies) Pacon Child Storage Pocket Chart (PAC20060) Educational Insights Horizontal Space Place Pocket Chart School Smart Over-The-Chair Storage Pocket - 14.75 inch x 23.5 inch
chair cover rentals ontario canada 5 star 64% 4 star 16% 3 star 3% 2 star 1% 1 star 16% See all verified purchase reviews Top Customer Reviews Very poor durability |
chair back support postureLove the idea and the pockets |
cheap wheelchair toronto
Great product, easy to use, kid friendly Its the perfect fit for our desk | These are great for my guided reading table supplies for each student ... | See and discover other items: staples chair, classroom chairSkip links Skip to primary navigation Skip to primary sidebar Ready to teach smarter and save time? Sign up for the FREE newsletter and receive my ebook 7 Pre-K Teaching Hacks I'm Vanessa Levin, an early childhood teacher, consultant, public speaker, and author.
exercise ball chair diyI was born to teach!
round wicker chair ukI have spent more than two decades teaching young children in public programs for at-risk English language learners.
places to rent folding chairsI believe learning should be fun! Here at Pre-K Pages, you can find hands-on lessons, themes, activities, and printables for preschool, pre-K, and kindergarten classrooms.
Instructions: As this is a sewing project, I have a PDF document for you to download with step by step directions to make the chair covers. If you can sew a straight stitch, you can make these easy as pie. These pocket chair covers can be made from one piece of fabric, cut, folded, and sewn with easy straight seams. They are easy to make and hold up great. Click HERE for the PDF step by step directions. Template: Blog Designs by Sheila Pin It button on image hoverI must admit that I was a little wary of this project when Cadie's teacher first asked me, but it turned out to be really fun and a lot easier than I expected. So if your kid's kindergarten or first grade teacher ever asks you about making chair pockets for the class, say yes - I'll show you how! First things first, my chair covers were inspired by the adorable 'Seat Stash' that Heidi of Fabricmutt made. Hers is totally cute and quilted and perfect if you only need to make one. But I was asked to make 20 in a short amount of time.
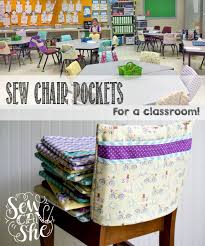
I opted to redesign it completely, making two pockets instead of one, and finishing the inside seam allowances with my serger instead of French seams. You could totally zig zag the raw edges if you don't have a serger. In simplifying the pockets, I decided to use just a double layer of fabric reinforced with a binding at the top. They turned out really cute - and fast. Guess what - it only took me 12 hours to make 20! After I finished all the cutting and presswork, I was making 5-6 each hour. Make sure you measure your little chairs before you get started. The backs of my chairs were approximately 11'' tall and the width at the base of the chair back was 15 1/2''. I decided that my pockets should be 12'' tall and 16'' wide. Funny thing, my little sewing chairs are the same size, lol. To sew the same chair pockets that I made, each one will require about a yard of fabric and a 17'' x 25'' piece of quilt batting. I pulled a whole bunch of different fabrics from my stash - mixing lavender, aqua, and yellow.

Cutting: For each chair pocket, cut: 1 exterior rectangle 17'' x 25'' 1 lining rectangle 17'' x 25'' 1 batting rectangle 17'' x 25'' 1 large pocket rectangle 17'' x 21'' 1 small pocket square 17'' x 17'' 2 pocket binding strips 1 3/4'' x 17'' Binding Prepwork: Fold the edges of the binding strip to the center and press. I used my Clover 1'' bias tape maker tool to make quick work of it. Then fold the strip in half lengthwise and press. Here's my pile of 40 - two for each chair pocket. Sewing: Fold and press each pocket piece in half with the 17'' edges together. Wrap a binding piece around the folded edge of a pocket and sew it down close to the fold. Repeat for the other pocket. Lay the 17'' x 25'' batting rectangle on your workspace and smooth out the exterior rectangle of the same size on top of it, right side up. Then line up the two pocket pieces with the bottom 17'' edge of the exterior. The smaller pocket goes on top of the larger one, and they are also both right sides up.

Now place the lining rectangle on top, right side down. Pin along both of the shorter edges. Using a 1/2'' seam allowance, stitch along the shorter edges only - not the long edges. After sewing, Turn the lining to the back and press along the seams you just sewed. Lay the pockets flat against the exterior piece, as before. Sew basting stitches along the raw edges of the pockets to hold them in place, if desired. Bring the top edge down to meet the bottom and make sure the pockets are flat on the inside. Pin along the side edges. Stitch the sides, again with a 1/2'' seam allowance. Flip the cover right side out and check to make sure your side seams are good. If the pockets are straight and all the layers were sewn properly... Turn inside out again and serger or zig zag the raw edges together for a nice finish. And that's one done! If you are planning to sew a lot, here are my tips: Use ugly fabric (we all have it!) for the lining, it won't show at all.