canvas deck chairs diy
1 - 6' 1/2" Diameter Wood Dowel 1 1/2 Yards Outdoor Fabric, 54" wide Sewing Notions and Thread 1 - 1x3 @ 48" long 4 - 1x2 @ 8 feet long 4 - 1/4" diameter bolts, 2" long with matching nuts 12 - washers to fit bolts Please read through the entire plan and all comments before beginning this project. It is also advisable to review the Getting Started Section. Take all necessary precautions to build safely and smartly. Work on a clean level surface, free of imperfections or debris. Always use straight boards. Check for square after each step. Always predrill holes before attaching with screws. Use glue with finish nails for a stronger hold. Wipe excess glue off bare wood for stained projects, as dried glue will not take stain. Be safe, have fun, and ask for help if you need it. 2 - 1x2 @ 48" 1 - 1x2 @ 24" 1 - 1x2 @ 25 1/2" 1 - 1x3 @ 24" 2 - 1x2 @ 44" 4 - 1x2 @ 23 3/4" 1 - 1x2 @ 22 1/4" 1 - 1x3 @ 22 1/4" 2 - 1x2 @ 15"
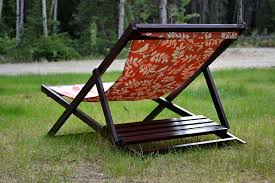
1 - 1/2" Diameter Wood Dowel @ 25 1/2" 2 - Outdoor Fabric Squares @ 54" x 22 3/4" 2 - 1/2" Diameter Wood Dowel @ 22" Build the back frame very carefully as shown above. The main weight bearing joints are going to be where the fabric slings pull on the headers - so take great care to use glue, carefully predrill holes, avoid splitting your wood, and attach in place. There is a 3/8" gap between the header boards. Drill the holes as shown above for the bolts. Build the smaller sling as shown above, taking great care again to create strong joints for the headers. Once both frames are complete, line the frames up as shown above, and insert bolts, with washers on both sides of bolt, and one washer between the two wood frames to protect the finish on your wood frames. The chair should now swing open, but there will be nothing to keep the chair from staying open. See next step . . . Build the propup support as shown above. Attach with bolts and washers to the backrest frame, in the remaining predrilled bolt hole.

Using a larger stitch length, topstitch edges along both (long) sides only. A decorative stitch is optional. Finish edges by tucking thread into project. Fold bottom and top over 1 1/2” to create “sleeves.” Topstitch using same seam allowance as on the sides.
black velvet chair and ottoman Finish edges by tucking thread into project.
baby shower chair rental in queens By threading the slings through the chair headers, then threading the dowels in the "sleeves" you create a sling that is held in place sturdily, but is easy to remove to wash or change the look up.
buy computer chair online in bangalore Chairs $20 - $50 Outdoor Ana's Adirondack Collection Advanced Farmhouse Style Furniture Plans
tables and chairs for rent in charlotte nc
Mix together 1 tsp. dishwashing detergent and 1 tsp. Borax in 1 quart warm water. Put the mixture in a spray bottle. Generously saturate the cushions on both sides with the solution. Do not be frugal -- it will clean off the mold and mildew. Be sure to get all the crevices and creases. The more you put on now, the less you will have to do when you wash it off. Let the cleaning solution sit for 15 minutes. Then with the garden hose on high, spray the cushions thoroughly to knock the dirt and cleaning solution off the cushions. Stand the cushions up on edge to let them dry to just damp. Spray the cushions with a fabric protector. This will both protect them and make them easier to clean in the future. Most of the time, canvas can be machine washed and then put back on the furniture while it is damp to stretch the material back into shape. However, if you can't remove the canvas, use a scrub brush and rub it across the bar of Fels-Naptha soap and then rub the brush back and forth on the canvas.

You may have to do this a few times — don't be afraid to really lather it up. Fels-Naptha soap works well for canvas awnings. It does a good job removing bird droppings and many stains. Once you get the canvas nice and clean, take the hose or a spray bottle and rinse it off. Sign up for weekly project ideas and advice from experts Privacy Policy Sign Up for More We love to DIY. You love to DIY. See the latest DIY projects, catch up on trends and meet more cool people who love to create. Make It. Fix It. Learn It. Find It. Get quick inspiration from Made + Remade each week. The Essential Steps to Landscape DesignTry These Plants and Groundcovers 10 Things You Must Know About Landscaping Lush Landscaping Creates Major Curb Appeal Making A Checkerboard Patio Garden How to Design a Great Yard with Landscape Plants How to Landscape Around a Back Deck Groundcovers and Plants to Use As Lawn Alternatives How to Landscape a Shady Yard