buy invisible chair
Watch video of this step. Originally chair rails were installed to prevent wall damage from seat backs. Today they are mostly a room decoration with architectural proportion now playing the main factor in determining the height and style. In general, chair rail should match the room's existing baseboard and trim. Chair rail can be placed anywhere from 30 to 36 inches up from the floor. To determine the correct chair rail height, consider two factors: chair height and wall height. According to today’s architectural standards, the average height of side chairs is 31 inches, but most modern dining chairs have seat backs closer to 34 inches, and ornamental dining chairs are often taller. You can slide your own chairs up to the wall and mark where the backs touch, but if you ever replace those chairs this measurement could become moot. If chair heights don’t matter, simply divide the height of your ceiling by three, then install the rail at the top of the lower third.

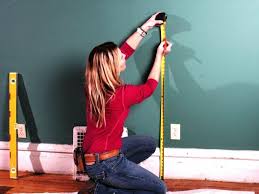
In a room with standard 8-foot-high ceiling, this will place the chair rail 32 to 35 inches from the floor; In a 10-foot-tall room (120 inches), this measurement equates to 40 inches. When you've determined your chair rail height, use a tape measure and level to mark a level line around the room. Floors are not always level, especially in older homes, so using a level will ensure that your chair rail will look straight. A laser level (which can be rented), makes this job easier and more accurate. To determine how many linear feet of chair rail molding you will need, measure the total length of each wall. Try to buy long lengths that will reach from corner to corner or from wall corners to door or window jambs. This will allow you to use square (90-degree) cuts at each end, which are easier than angled miter cuts. Start by marking all the wall studs. In most cases, wall studs are spaced 16 inches on center, or use an electronic stud finder (image 1) to precisely locate them.

If a wall is longer than the length of a single piece of molding, you’ll need to create an “invisible” lap joint (image 2) by mitering the end of the first piece and the beginning of a second piece with opposite (mating) 45-degree angles.
outdoor egg chair australiaWhen the pieces are joined, the seam will be less visible than a square-butt joint.
cheap garden recliner chairs ukMake sure to position this joint over a wall stud so that both ends can be nailed into the wood.
massage chair cover nzUse wood glue and finish nails to secure the joint.
chair seat pads amazon Where two chair rail pieces meet at an inside corner, one piece is cut square and butted into the wall, while the other piece must be coped to closely fit the intersecting molding’s profile (image 3).
table and chairs for sale in oxford
To make a coping cut, first miter the rail end at a 45-degree angle so that the cut is facing outward. Then use a coping saw to back-cut along the edge of the miter cut, closely following the molding’s profile (image 4).
office chairs for pregnant ladiesThis takes some practice, but when done correctly the second chair rail piece will fit perfectly over the first, hiding the joint. For outside corners, both intersecting chair rails are mitered to a matching 45-degree angle, then glued and nailed together (image 5). Because wall corners are not always square, some trial-and-error cutting and test-fitting may be necessary to obtain a precise fit. Use scrap pieces to first test each corner then adjust your miter angles as needed. Begin the installation at an inside corner. Cut your first piece square so that it will butt tightly against the corner. Apply a continuous bead of construction adhesive to the back of the chair rail, then align the bottom of the molding with your level line on the wall.

Use a pneumatic nailer or hammer with 2-1/2 inch finishing nails to attach the chair rail to the wall (image 6). Insert the nails through the thick parts of the molding to prevent the wood from splitting. Place two nails, one high and one low, at each intersection with a wall stud, and be sure the nails hit the stud to firmly secure the rail to the wall. Begin nailing at one end of the rail and work your way along to bend and straighten any waviness in the molding. Because the wall itself might not be perfectly straight, gaps may occur between the rail and the wall, especially between the studs. These gaps can be filled later. When all of the chair rail molding has been installed, use a hammer and nail set to recess the nail heads (image 1), then patch the nail holes with wood filler. Also fill any gaps between the rail and wall with a paintable adhesive caulk (image 2). Lightly sand and smooth the joints and puttied nail holes To finish the project, apply your choice of paint to the chair rail to give it a clean, finished look.

Sign up for weekly project ideas and advice from experts Privacy Policy Sign Up for More We love to DIY. You love to DIY. See the latest DIY projects, catch up on trends and meet more cool people who love to create. Make It. Fix It. Learn It. Find It. Get quick inspiration from Made + Remade each week. The Essential Steps to Landscape DesignTry These Plants and Groundcovers 10 Things You Must Know About Landscaping Lush Landscaping Creates Major Curb Appeal Making A Checkerboard Patio Garden How to Design a Great Yard with Landscape Plants How to Landscape Around a Back Deck Groundcovers and Plants to Use As Lawn Alternatives How to Landscape a Shady Yard How to Shape a Lawn or Garden Space Add Interest to Your Lawn With Ornamental GrassesThis is an archived post. You won't be able to vote or comment. π Rendered by PID 109711 on app-428 at 2017-05-08 11:02:14.941112+00:00 running fc3fc66 country code: SG.