bean bag chairs filled with stuffed animals

Bean Bag Patterns Bean Bag Chairs Bag Tutorials Bean Bags Beans The One Side Panels Vito Paper Patterns Forwards bean bag tutorial... for the one who prefer custom stuff... like me :)Bear Faux-Fur Critter Beanbag Bear Faux-Fur Critter Beanbag It's the softest – and cutest! – seat in the house. Our superior quality faux-fur is luxuriously cozy and the comfy beanbag chair is both relaxing and so much fun. The faux-fur is made to look and feel like the real deal and the insert is crafted of partially recycled materials. Plush beanbag inserts are filled with 13.5 cubic feet of up to 50% recycled polystyrene. Slipcover is made from 100% polyester sherpa fur. Recycled fill may contain a mix of dark and light beads within the insert. This is perfectly normal and safe. Critter face is made with satin stitching and from 100% polyester velboa. The zippers on the beanbag inserts have been sealed to protect the fill and ensure lasting quality. For best use, insert and slipcover seams should both run vertically;
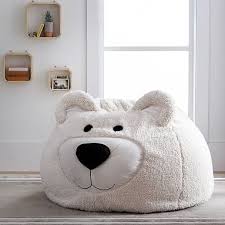
horizontal seams can make the bag appear flat. Insert is not intended for use without a slipcover. Slipcover and insert are available individually or as a set. To clean, remove interior components. Machine wash in cold water, gentle cycle. Only use non-chlorine bleach, if needed. Tumble dry on low heat, remove promptly. Spot clean with damp white cloth, blot to remove excess water. Do not wash or dry clean.Bean Bag Chair — A Storage Solution (stuffed animals, extra pillows & blankets) There will definitely be a theme of “the dissertation is done, so Debbie is starting to play ‘catch-up’ with projects” with my upcoming posts. It has been so nice to sew/cook/craft again. Not that I worked on the dissertation/school work ALL of the time, but I found myself feeling so guilty about doing anything else, that instead, I would just sit and do nothing or web-surf looking for new projects that I didn’t have time to do! A while ago, Jen came across in a catalog this creative way to store stuffed animals.
Did she order a couple? Oh no, she said, “I bet Mom could make those a lot cheaper!” (I think they were about $75 in this speciality catalog). I did manage to make one for Little S (who had the stuffed-animals-reaching-the-point-of-room-takeover situation going on!) and she received it for her birthday over a year ago.
french louis chairs ebayBoth of the girls loved the project and requested I make them for the rest of the “grands” — I bought the fabric, even cut it out, but didn’t get them made until just in time for this Christmas.
french louis chairs ebayAnd, they were a hit!
cheap wheelchair scooters This “storage solution” would also work great for a dorm room or small apartment (to store extra linens, winter jackets, etc.).
chair cover rentals southeast michigan
Start out with any bean bag chair pattern.. I used “D” of Simplicity Pattern #5105 (which I can guarantee was purchased during one of JoAnn’s any-pattern-for-$1.99 sales — I do NOT pay full price for patterns!).
cheap chair covers omaha Heavy fabric, such as duck or denim (you do not want it to be stretchy!), according to pattern requirements
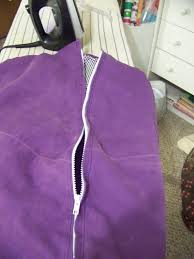
massage chairs for sale in india 22″ long zipper (closed at one end) 1/2 yard mesh fabric (like what is used for laundry bags) Cut out the fabric pieces according to the pattern directions. Begin sewing pieces together, again, according to the pattern directions; however, instead of just a simple seam between two of the pieces, insert the zipper. For the piece which will be opposite where the zipper has been inserted, cut out some of the heavy fabric and insert a “window” of the mesh fabric.

In the “sample” Jen found in the catalog, this window was made of vinyl … so that was how I made the first bean bag — not a good idea! Little S almost immediately zipped herself (we should have known!) into the bag and couldn’t get out. Luckily, a little friend was over playing and we were alerted to her predicament! So, before making anymore, I did a bit of fabric “research” and came up with the mesh idea. If you’re making one of these for an older child or teen, or even a young adult, the “window” isn’t really necessary — mainly just allows for the furry friends to be remembered! Continue to follow pattern directions to complete the “bean bag chair”, simply using your “modified” panels. Since these “chairs” are likely to get heavy use (Little S drags hers all over the house so she can sit wherever the action is happening!), I double stitched all seams and top-stitched through the seam allowances which I pressed to one side.Remember how I mentioned I’ve been on a DIY kick lately, brought on by my illness-induced antsy-ness and disinterest in food?
Well, one night recently it drove me to the internet, where I got stuck for hours on a single website. (I fell way down that rabbit hole!) I bookmarked tons of projects, but the one that compelled me to actually make something right away, was a pattern for a bean bag chair. (Do you ever find that while the internet is a great resource, you often have time to either do a project or read about one, but not both? I wish we could buy an iTunes gift card for our own time.) Anyway, the pattern was designed by a sewing blogger. You can find it here. She calls it a Rollie Pollie, and it’s marvelous. It does cost $8, which gave me pause. I have grown accustomed to getting things for free on the internet, but I eventually realized that I wouldn’t bat an eye at a corporation charging for a pattern, and I was actually much happier to support an entrepreneur instead. So I ponied up the money and am so glad I did. The pattern requires advanced-beginner to intermediate sewing skills, and about 12 hours of time (if you’re rusty like me).

The pattern is delivered via email and prints onto 8 ½ by 11 paper, which you then tape together (see my tips below) and use to cut out your fabric. The pattern instructions are detailed, and the comments on the blog entry are informative, too. One reader’s comment got me to think outside the box about how to stuff the Rollie Pollie. I wasn’t too keen on spending nearly $50 for polyester fill, for reasons of thrift and environmental concern. Also, to be honest, I was impatient. I didn’t want to wait the week it would take to have the stuffing delivered. So, while standing in the garage trying to remember what I went out there for, I noticed our sleeping bags, which have never found a proper home. Then and there I decided to stuff the Rollie Pollie with soft odds and ends we had lying around: extra cushions, guest pillows, a couple stuffed animals, and those very same sleeping bags. Now our Rollie Pollie provides my son with a comfy place to read and go bonkers, all while providing storage for items that otherwise float around our home without finding one of their own.

However you decide to fill the Rollie Pollie, the pattern calls for an insert and a slip cover (so basically you sew two covers). This design is super practical as you can remove and wash the cover as needed. Good thinking, if it’s meant for kids. The cover material I chose is fabric I bought in Nigeria years ago that is intended for traditional women’s dresses. It’s a mid to heavyweight cotton. I love how the bold pattern, alternating the panels, really stands out on the Rollie Pollie. Ikea has a lot of great options, too. In case you decide to make your own Rollie Pollie, and I highly encourage you to do so, I’ve added a few tips and comments on the process here. Join the internal corners first, then the places where the pattern pieces meet. That is, don’t bother taping the outer edges of the pages together – you’re just going to cut them off. Focus on connecting the spots where you’ll cut the pattern out (i.e., across the point where the arrows meet), so the papers remain attached after cutting them.

If you use extra pillows, etc… like I did, you’re probably going to want to be able to remove them from the Rollie Pollie when you need to use them. For that reason, I altered the pattern to include an opening in the insert, too. I gave it a Velcro closure (honestly, because I didn’t have a zipper on hand). The open-able insert also makes stuffing the Rollie Pollie a lot easier, since you’re adding only one item at a time instead of wrestling to get the entire thing inside the slip cover. You’ll see what I mean if you buy the pattern. No doubt the traditional fill would make a softer and lighter Rollie Pollie (mine weights quite a bit). I may eventually upgrade the filling to the Cluster Stuff the designer recommends. ), and you’ll need 9-10 bags for a large Rollie Pollie. A pretty good deal, too, considering. The pattern instructions give good guidance on the type of fabric to use. I will just add a comment about the fabric pattern. The blog entry shows pictures of four different Rollie Pollies, so you can get a feel for whether you prefer a solid or a pattern, a small print or a bold one.
In addition, I think it’s worth it to lay the fabric you’re considering over something vaguely shaped like a bean bag so you can visualize how it will look on the final product. Initially, I spread seven options flat on the couch and was least excited about the one I eventually chose. Once I draped the options over a large round pillow, I could see immediately that my preferred fabrics were much too subtle for a bean bag chair. Thus, my least favorite option (initially) became my first choice for the Rollie Pollie. I used a 24″ sport zipper with large plastic teeth. It’s not as fine looking at the lovely ones shown in the pattern, but it’s a fun color and I figure will hold up better to the abuse it will surely take over time. And even thought it’s chunky it is still pretty invisible once completed. I do think it’s worth shoring up the ends of the zippers for extra security. I just winged it with a couple of boxes going back and forth with a zigzag stitch (leaving a gap where the zipper crosses).