antique office chair restoration

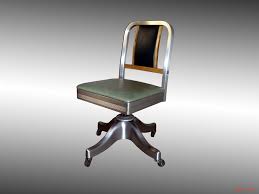
Last week I shared my office make-over and told you about how I scored a vintage chair on Craigslist. It looks so similar to the more expensive vintage chairs made by GoodForm. I spent many hours restoring this vintage desk chair, but it was sooo worth it. Here are a couple of photos of the chair before: As you can see, it was in decent shape, it just needed a make-over. I didn’t feel too guilty about changing the look since it isn’t a highly valuable antique. The great thing about this chair is that it’s virtually indestructible since it’s all made of metal. I started by removing the paint from the metal base and back. I used Citristrip, which is a safer, less-toxic paint stripper. After using the paint stripper to remove as much paint as I could, I resorted to sanding with 120 grit sandpaper to get into all the nooks and crannies. I wore a protective mask and took lots of breaks for this because with anything made prior to the 80s, I always worry it could have lead paint…and I seriously didn’t want lead poisoning.

I’m not much into making patterns, so I traced right onto the back side of my fabric.
outdoor swing chair walmartI did however trace the shape generously to give room for a seam allowance.
red leather chair ottoman The seat only measures 17″ and the traced image was over 18″ so I had at least a 1/2″ seam allowance in all directions.
wingback chair covers pattern After checking my measurements several times, I cut out my “pattern” for the seat bottom.
wingback chair covers patternTo make the edge of the seat, I cut a 6 inch band of vinyl measuring the circumference of the cushion. I added a couple inches for the seam allowance and it came to 65″ long.

I pinned the two pieces of fabric together, with right sides touching, before sewing it into place. Ignore the fact that my pins are running parallel to the seam…I always forget to pin things perpendicular when I use a sewing machine. A long time ago, in a home ec. class of all places (do they even have those anymore??), I was told that if you don’t pin perpendicularly, the head of the pins can break the sewing machine needle as you try to sew over them…and I have done that before. So, just to be safe pin perpendicularly to the fabric edge when using a sewing machine… or you can be brave like me and feverishly yank the pin out right before it reaches the needle. Back to the project…lol. Luckily, It slid right on to my seat cushion and I was able to wrap the remaining fabric under the seat and staple it in place with a staple gun. The hardest part was making lots of little folds at the corners to get them as smooth as possible. The back rest was actually much easier.

I simply stretched the vinyl over the frame without removing the original vinyl and pinned it with binder clips to hold it in place. The way the back plate attaches, it holds the fabric in place by mere compression. I used the binder clips to “shape” the vinyl around the frame so that when I removed the clips I could put my back plate on without my vinyl falling off. I left the clips on for about 24 hours and it worked really well. Here it is all put back together and with a fresh new look. I still wanted a vintage feel but I wanted it to go with my color choices and decor. Overall I am thrilled with how it turned out and it compliments my office just perfectly! The page you requested cannot be found. NEW YORK — I recently finished renovating a chair and I grin every time I see it. Though it cost me barely anything, if I recouped the hours, materials, transportation and labor the job required, it would be worth thousands. Luckily, it was a labor of love.

And one thing I learned is that if you don’t know what you’re doing, it’s free to ask. Through a class at 3rd Ward, at 195 Morgan Ave., Williamsburg, I met Christopher Anigacz, founder of Double Queue Fine Furniture Restoration and Conservation in Long Island City. Anigacz, 39, specializes in traditional French polishing and has been finishing and fixing fine furniture for 17 years. Though he teaches a three-night class for hobbyists, he is the first to tell you that you can’t learn how to renovate by doing it once. "No two pieces are the same. If there's a leg missing we make the leg, if there's a veneer missing we replace the veneer," Anigacz said. "There's rarely a piece that comes into the shop that you strip and refinish. You got to take it apart and fix it. Fix the chips, you know what I mean?" Anigacz gets all his business word of mouth. He has and doesn’t advertise. He charges $90-per-hour in the shop and $140-per-hour for on-site visits. However, with the right introduction and a good sandwich, you might be able to get him to show you how to do it for free.

And that’s exactly what I did. Once a week for about two months, I made the trip to his Long Island City workshop where he let me store my chair. In exchange for a weekly lunch, consisting of fancy sandwiches, he showed me how to restore my gentleman’s chair. Not too often do you get to work alongside a pro. During my senior year of college, I got on a kick about architecture and antiques. After working a bit with an architectural salvage dealer, I bought a lot of furniture from a 19th-century estate house in northeast Connecticut. Among the pieces was a gentleman's chair frame, painted a flat dark green. It was beautiful, but mistreated and unusable. I rushed back to my apartment, got all sorts of products and embarked on stripping the chair. There are few things you should know before you go down this road. Buy and go for it. Be picky with what you strip. Scrape off some paint with a razor blade to identify the wood first (or consult a carpenter or decorator).
Stripping paint is far more difficult that stripping varnish. Buy Kutzit Paint and Varnish Remover at your local hardware store or from online retailers. All commercial strippers are weak but this one is the best. If you really want to get serious — saving time and money — order an industrial-grade remover from Kwick Kleen . The smallest size they sell is a 5-gallon jug. This stuff is highly dangerous and will burn you if it gets on your skin. Larger salvage shops use baths of Kwick Kleen to strip doors and mantles in one fell swoop, cutting down 90 percent of the workload. When working with furniture, patience is key. Somehow I got through 50 hours of stripping by watching "Law & Order" marathons. Then I got so frustrated, I quit. I put everything in storage and moved back to New York to take a new job. Fast forward six years. The chair comes out of a Westchester storage locker. Much further along in the stripping process than I had given my college-self credit for, but it nonetheless needed more cleaning up before I treated it.

At the workshop, Anigacz, my self-described "Polish Joey Tribiani" restoration expert, showed me how to use a chisel to chip out the paint build-up in the corners. Then I applied 150-220 grit sandpaper with an orbital sander to further buff the flat surfaces. Any repairs the chair needs should be done before stripping, but I was already too late. It’s a step that almost certainly requires the hand of someone who has fixed chairs before. Anigacz checked the chair for structural problems — e.g. wobbliness. It is terrifying when you watch him make fixes to furniture. B ut he knows what he's doing when it comes to gluing, filling in holes with wax and drilling holes for the dowels to secure the front joints. The most important decision was the color of the stain. I wanted a driftwood gray but Anigacz shook his head no. "The wood wants to be red. Let it be formal," he said. In just about every scenario, when going formal, less is more but quality is key. Careful not to become gaudy, I decided on a dark club chair color and would match stain to leather with brass studs.

Anigacz applies most stains and shellacs with what he calls, in a French accent, a "tampon." It's a wad of cheesecloth folded in two, stuffed inside a square piece of white T-shirt cotton, just like you’re making the head of a ghost doll. Apply the stain or shellac inside on the cheesecloth, fold each corner of the cotton square over the wad and twist the four corners so you’re holding a wet round ball of cloth with your fingertips. We put on a coat of the reddish water-based dye from Abbot Paint and sealed it with a coat of shellac. Touch-ups afterwards are for all those little corners with paint, chips or blemishes in the wood. For the chips and nicks, apply the closest matching bondo wood filler and apply it with quick scalpel-like precision. (See more specific instructions on activating bondo here. ) Mixing pigment powders with shellac on a little surface, match the corners with the rest of the chair. Use a tiny paint brush but still be sure to tap your brush on a napkin before applying it to the wood.

Before my next visit, I went to W.D. Lockwood, a hidden dye and pigment store that’s been in business since 1895, and bought a yellow-green pigment to cut down the hint of purple in the wood. Mixed with shellac and applied with one or two coats, the wood became more orange. I must have spent two days just applying shellac. Shellac, then 320 sandpaper, shellac, 320, shellac, 320 — five or six times. After the final shellac, rub the chair down with 0000 steel wool — it’s the finest grade. With a piece of T-shirt cotton, apply beeswax. Anigacz makes his own with carnauba, better known as palm wax. Upholstery is the last step. I had already invested $110 in leather and another $45 on a box of 1,000 studs and wanted perfection. We brought in Anigacz’s upholsterer-on-call, Patricio. He charged $200 because of the studs — and it was worth every penny. Anigacz, me and a carpenter from upstairs all drank cans of Polish beer and watched him work. Anigacz says if you don’t feel confident about renovating a piece of furniture or if there’s something actually broken, go to a professional.